
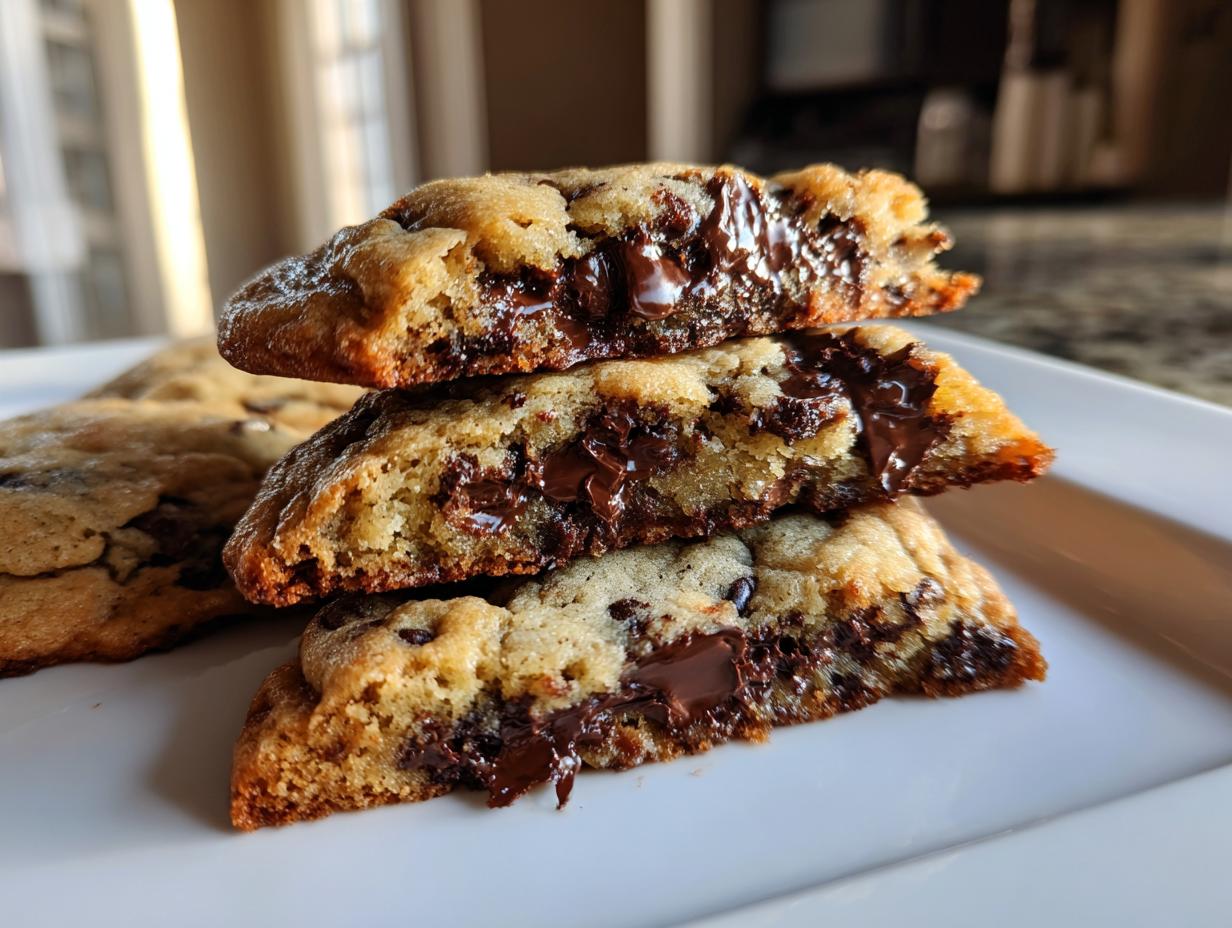
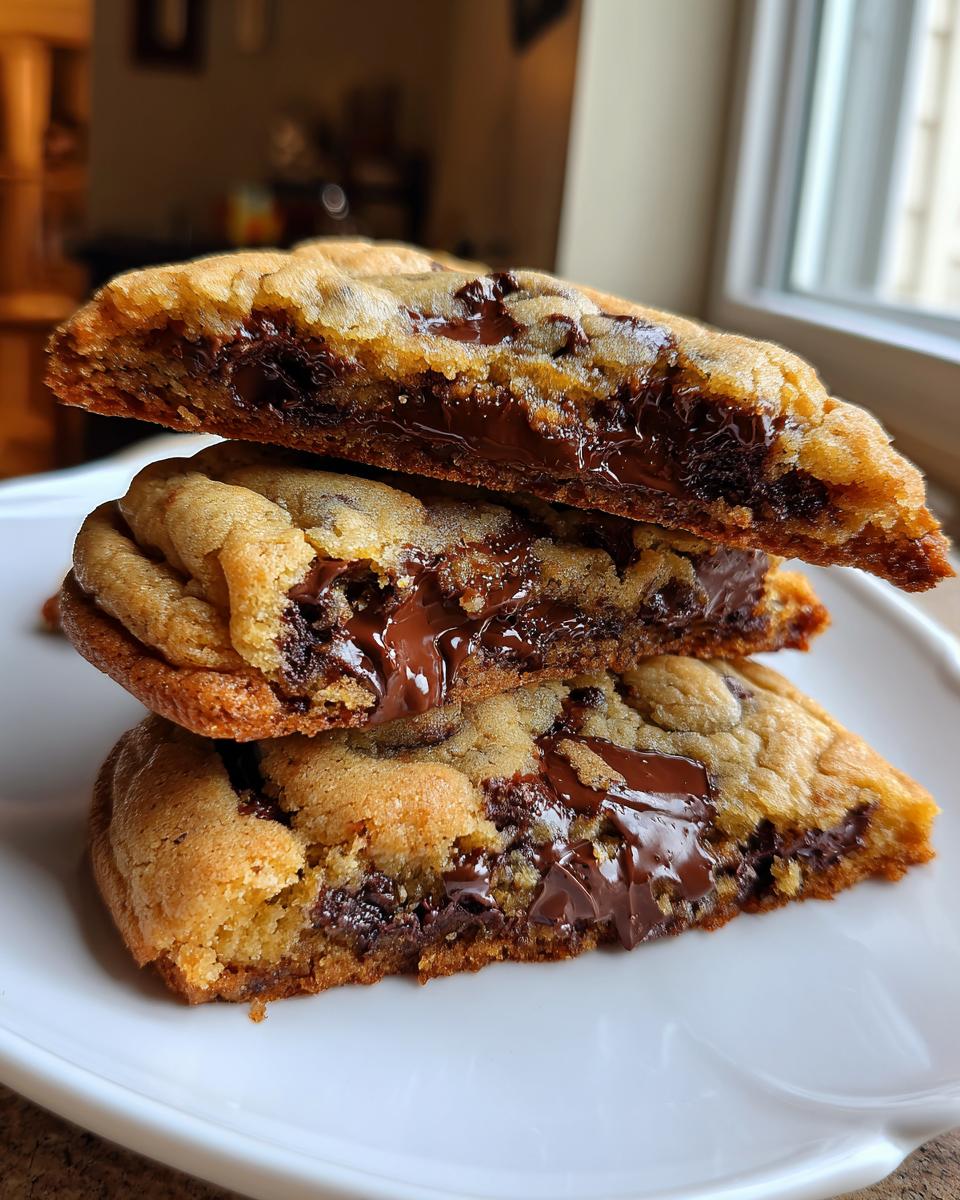
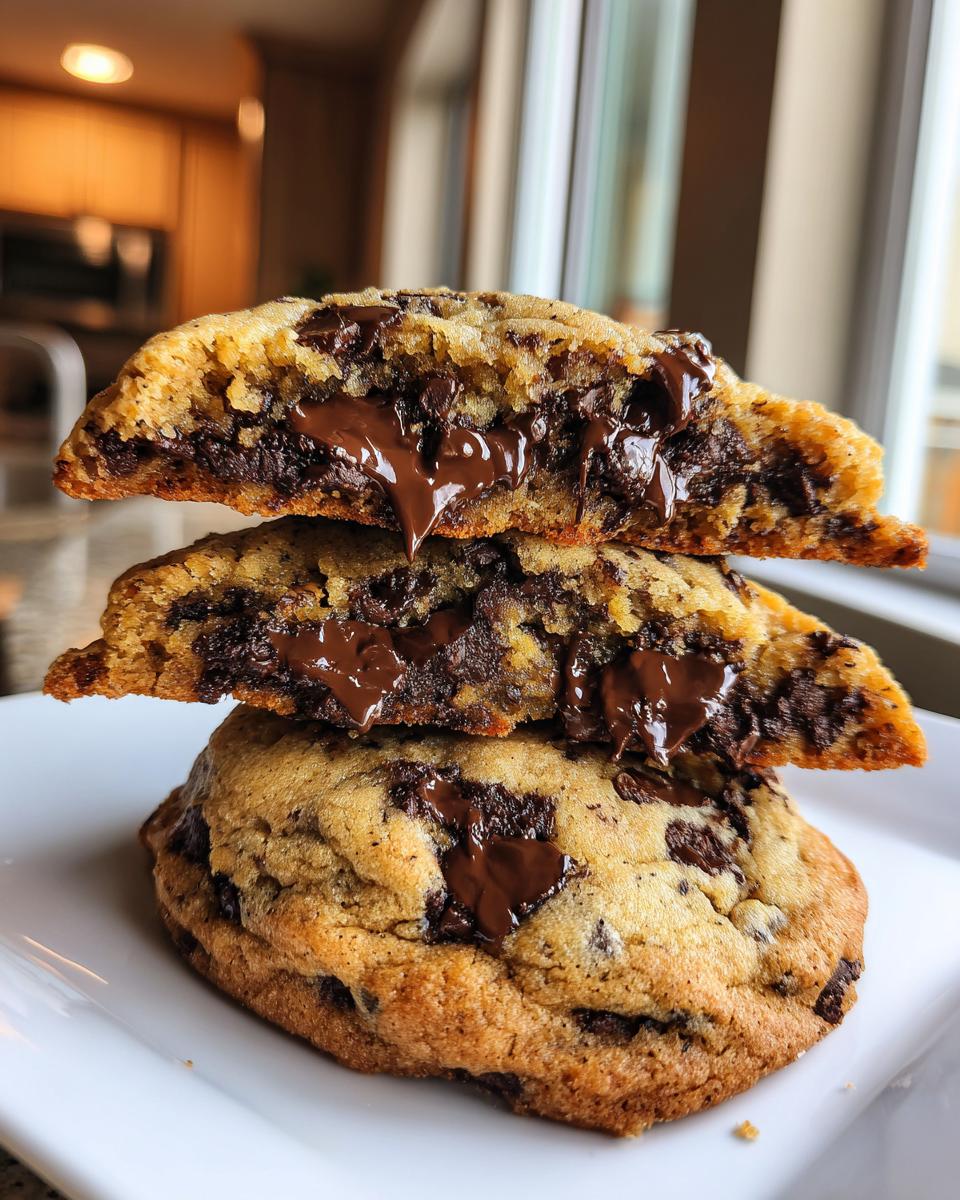
Hello there, and welcome to Frosted Fancies! I’m Katie, and I’m so happy you’ve stopped by looking for the absolute best dessert. I know the pain: you want those towering, thick **chocolate chip cookies** you see in the best bakeries, but you usually end up with flat, dry discs. Well, toss those sad cookies out! After years developing recipes professionally—and diving deep into the science of why things spread—I’ve cracked the code. This recipe guarantees you’ll get that perfect combination: thick bodies, wonderfully chewy centers, slight crispy edges, and chocolate that melts perfectly. Trust me, this is the homemade cookie you’ll bake again and again!
- Why This is the Ultimate Chocolate Chip Cookies Recipe (The Science of Thick Cookies)
- Ingredients for Thick Chocolate Chip Cookies
- Step-by-Step Instructions for Chewy Chocolate Chip Cookies
- Pro Tips for Homemade Chocolate Chip Cookies Success
- Ingredient Deep Dive: Selecting Chocolate for Your Chocolate Chip Cookies
- Serving Suggestions for Your Ultimate Chocolate Chip Cookies
- Storage and Reheating Instructions for Chocolate Chip Cookies
- Common Questions About Baking Perfect Chocolate Chip Cookies
- Nutritional Estimates for These Chocolate Chip Cookies
Why This is the Ultimate Chocolate Chip Cookies Recipe (The Science of Thick Cookies)
So, you want the secret to cookies that defy gravity? It comes down to a little bit of food science—which I happen to love! This isn’t just another recipe; it’s a guaranteed method designed to give you those highly requested bakery style chocolate chip cookies with that incredible balance. We’re talking thick structure, chewy insides, and those irresistible crispy edges, making this the best chocolate chip cookie recipe you’ll find.
The magic relies on two key non-negotiables: the fat ratio and the chilling time. A higher ratio of brown sugar helps retain moisture for chewiness, while using melted butter, cooled just slightly, ensures you get that perfect dense structure instead of spreading out too thin. This approach makes it a true no fail cookie recipe for home bakers!
Achieving Bakery Style Chocolate Chip Cookies
To nail that thick, bakery look, we rely heavily on technique over fancy equipment. Using melted butter, instead of softened, coats the flour particles differently, discouraging gluten development slightly and keeping the cookie fudgy rather than cakey. The ratio of brown sugar to white sugar is intentional too; that molasses in the brown sugar helps fight off dryness while still setting up that desirable chewiness when baked.
Ingredients for Thick Chocolate Chip Cookies
When you’re aiming for cookies that look like they belong under glass at a fancy bakery, having the right ingredients on hand is half the battle won. Please measure everything carefully—baking is chemistry, after all! Here is exactly what you need to pull off these incredible treats. I’ve put the link to a favorite resource nearby in case you need to stock up!
- 1 cup (2 sticks) unsalted butter, melted and slightly cooled
- 1 cup packed light brown sugar
- 1/2 cup granulated sugar
- 2 large eggs, room temperature
- 1 tablespoon vanilla extract
- 2 1/4 cups all-purpose flour
- 1 teaspoon baking soda
- 1/2 teaspoon salt
- 1 1/2 cups semi-sweet chocolate chips
- 1/2 cup milk chocolate chunks (optional, for extra gooey centers)
- Flaky sea salt, for topping (optional)
A quick word on those eggs: Don’t just grab them cold from the fridge! Room temperature eggs mix into that melted butter mixture so much better. This ensures a stable emulsification, which is key to keeping your homemade chocolate chip cookies thick and not greasy. It’s a small step that makes a huge difference, promise!
Step-by-Step Instructions for Chewy Chocolate Chip Cookies
Alright, this is where the real kitchen magic happens! This process moves a little differently than your standard drop cookie recipe, but I promise every step is designed to get you those incredible, thick, **chewy chocolate chip cookies** with those melt-in-your-mouth **gooey center cookies** we crave. Because we’re using melted butter, our technique has to be precise to stop everything from spreading into thin lace cookies. Pay close attention to the mixing stages; that’s where my food science background really comes into play here!
Mixing the Wet and Dry Components of Your Chocolate Chip Cookies
First up, grab your butter! Make sure that melted butter isn’t hot—just slightly warm or room temperature is perfect. In your big bowl, whisk that melted butter with both the brown and granulated sugar until it’s completely smooth. We’re dissolving that sugar crystal structure here, which seriously boosts chewiness later. Next, beat in those room-temperature eggs one at a time until everything looks incorporated, then stir in that vanilla. Separately, whisk your flour, baking soda, and salt together. Now comes the warning: add the dry mixture to the wet mixture gradually and mix on low speed until it *just* comes together. Stop mixing the second you don’t see massive streaks of dry flour left. Overmixing develops gluten, and we want chewy, not tough!
The Critical Chilling Phase for Perfect Chocolate Chip Cookies
If you try to skip this part, I will personally come over and make you stick the dough in the fridge! Seriously, this is my biggest secret for getting those incredible thick chocolate chip cookies. You absolutely must chill the dough for a minimum of two hours, but honestly, overnight is where the flavor deepens and the structure locks in. Chilling solidifies that melted butter again, which means your dough balls won’t immediately flatten out when they hit the hot oven. Trust Katie on this one—chilling equals thickness!
Baking and Setting Up Your Crispy Edge Cookies
Preheat your oven to 375°F and line those sheets with parchment paper; we want easy clean up! Scoop out about three tablespoons of dough per cookie. If you want them extra thick, stack two scoops on top of each other—it looks wild, but trust the process! Bake them for about 10 to 13 minutes. You’re looking for edges that are golden brown and set, but the very center should still look puffy and slightly underdone. Immediately—and I mean right when they come out—gently tap the whole baking sheet against the counter two or three times. This shocks the cookies, deflates the puffy center just a hair, and guarantees that fantastic gooey texture inside while keeping those perimeter crispy edge cookies intact. Sprinkle with flaky sea salt if you’re feeling fancy, and let them sit on the hot sheet for five minutes before moving them to the rack. Perfection!
Pro Tips for Homemade Chocolate Chip Cookies Success
You’ve got the recipe down, but sometimes those little extras turn a great cookie into a legendary one. Since I spent years developing recipes that *had* to work for thousands of people, I have a few quick insider tips to make these the absolute best you’ve ever baked. Think of these as the finishing touches that elevate your **homemade chocolate chip cookies** into the realm of the absolute **best dessert recipes**!
First, let’s talk chocolate quality. Don’t skimp here! I recommend using a mix of chips *and* chopped chocolate bars. The chips hold their shape better, but the chunks create those beautiful, melty pools of chocolate that are everything. Look for quality semi-sweet and maybe some milk chocolate chunks for added gooeyness.
If you want to go next-level—and I mean *next-level*—try browning your butter before melting it down. You just cook the butter in a pan until those milk solids toast and smell nutty. Cool it completely before using it. It adds a deep, caramel background flavor that is unmatched, though it does add a few extra minutes to your prep time. You can find a quick guide on how to achieve that rich flavor right here.
Oh, and one last thing: If you notice your edges aren’t quite crispy enough, try bumping up your granulated sugar just a touch next time. That sugar caramelizes faster and gives you that wonderful snap!
Ingredient Deep Dive: Selecting Chocolate for Your Chocolate Chip Cookies
I want to spend just a minute talking about the star of the show: the chocolate! Because we are going for those incredibly thick, bakery-style cookies, we need them to be seriously loaded, which is why I call this the perfect formula for **chocolate loaded cookies**. If you just toss in a bag of standard chips, you’ll still get a great cookie, but you’ll be missing out on the texture explosion the pros get.
My absolute favorite trick, which I mentioned briefly before, is mixing your chocolate types. Standard semi-sweet chocolate chips are fantastic because they are coated with stabilizers that help them hold their shape during the bake. They give you that nice defined chip throughout the cookie. However, if you only use chips, the texture can be a little one-note, right?
That’s where the chunks come in! I love grabbing a good quality dark or milk chocolate bar and roughly chopping it into uneven pieces before adding it to the dough by hand. These chunks melt down wonderfully because they don’t have those stabilizers, creating those luscious, glorious puddles of molten chocolate in the center when you pull the cookie out. Try using about a 2:1 ratio of chips to chunks—it’s a game-changer for that **gooey center cookies** feeling!
Finally, if you opt to use that flaky sea salt on top (and I really hope you do!), it’s not just for looks. That tiny burst of salt right on the surface beautifully cuts through the sweetness of the brown sugar and the richness of the chocolate. It just makes the whole cookie taste brighter and more complex. If you struggle to get your edges perfectly crisp and chewy, sometimes boosting the salt just a tiny bit on top helps that balance shine. You can find more reinforcement on achieving that perfect chewiness profile over at this great guide!
Serving Suggestions for Your Ultimate Chocolate Chip Cookies
Honestly, once you pull these **ultimate chocolate chip cookies** out of the oven, resisting them until they cool is the hardest part of the entire recipe! But if you manage to wait even five minutes, trust me, the rewards are huge. Since these cookies are so rich, thick, and packed with chocolate, they pair perfectly with simple, classic complements that let that intense chewiness shine through.
The number one pairing in my house, especially after a long day of recipe testing, is undoubtedly a big glass of ice-cold milk. There’s something about the cold, creamy dairy hitting that warm, slightly salty, intensely chocolatey cookie that just feels like coming home. It’s the best dessert pairing, period!
For the grown-ups, these cookies are fantastic alongside a hot cup of coffee. The slight bitterness of the coffee is an amazing foil to the dark brown sugar and the richness of the chocolate chunks. If you fancy something warm, pairing them with a mocha is just heavenly—it doubles down on the chocolate goodness!
If you want to serve them slightly dressed up (maybe for a dinner party, though these are just as good for Tuesday night!), I love a very light dusting of powdered sugar right before serving, especially if you skipped the sea salt topping. It gives them a little visual elegance without messing with that amazing texture we worked so hard to achieve. Check out some other fun ideas over at this recipe site for more inspiration on enjoying your perfect batch!
Storage and Reheating Instructions for Chocolate Chip Cookies
These bakery-style beauties are designed to be thick and chewy, which means they rely heavily on internal moisture. Unlike thinner cookies that get rock hard faster, we want to preserve that wonderful gooey center! The key to keeping these perfect for days is how you store them immediately after they’ve cooled down completely on the rack.
You absolutely must keep them in an airtight container. If you just pile them on a plate on the counter, the air will steal that wonderful moisture, and they will harden up faster than we want. I use simple Tupperware containers—make sure the lid seals tight! Stored this way at room temperature, they should stay wonderfully soft and chewy for about four to five days. Don’t even think about putting them in the fridge; the cold air dries out baked goods something awful!
Now, if you’ve waited a couple of days and they’ve lost just a tiny bit of that initial softness, don’t worry! We can bring that gooey magic right back. This is the easiest trick, and it takes seconds. Pop one or two cookies onto a microwave-safe plate. Microwave them for just 8 to 12 seconds—no more! Watch them closely. You want the chocolate chips to just start melting again, making the middle super soft and warm. If you give them too much time, they’ll melt entirely and you’ll lose that perfect structure we worked so hard to achieve.
If you want a slightly crisper edge restored without softening the middle too much, try heating them for about 4 minutes on a baking sheet in a toaster oven set to 300°F. It just crisps up the outside perfectly without nuking the center. For more great tips on maintaining the texture of crispy and chewy cookies, check out the advice on this site. Happy snacking!
Common Questions About Baking Perfect Chocolate Chip Cookies
I know when I first started trying to perfect my technique, my head was spinning with all the little things that can go wrong! Since so many people ask me about fixing common cookie issues, I figured I’d tackle the most frequent ones right here. Don’t stress if you’ve had flat cookies in the past—we’re fixing that right now with these **classic chocolate chip cookies**!
Why did my cookies spread so thin?
This is almost always caused by one of two things: skipping the chilling step or having butter that was too warm when you mixed the dough. Remember how I emphasized that melted butter needs to cool down? If it’s too warm, the cookies immediately liquefy in the oven before the structure can set. For the thickest batch, ensure your dough chills overnight. If you need a quick fix next time, try adding just one extra tablespoon of flour to the recipe, but honestly, chilling is the real magic for those bakery style chocolate chip cookies!
Can I substitute salted butter for unsalted butter?
Yes, you definitely can, but you have to adjust the added salt! My recipe calls for precisely 1/2 teaspoon of salt because we start with unsalted butter, which lets me control everything. If you only have salted butter, use it, but skip the extra 1/2 teaspoon of salt in the dry ingredients. If your butter is heavily salted, you might even decide to reduce the salt by half. This ensures your cookies don’t come out tasting slightly savory when you’re aiming for the perfect sweet treat!
Do I absolutely have to chill the dough?
Look, I tell you it’s critical, but maybe you’re having an emergency chocolate craving right now! While the chilling time is the secret weapon for **thick chocolate chip cookies**, if you are truly desperate, you can try freezing the dough balls instead. Freeze them for about 20 to 30 minutes. This acts like a super-fast chill, firming up the fat enough to prevent too much spread. It’s not quite as good as overnight chilling, but it’s certainly better than flat cookies!
Nutritional Estimates for These Chocolate Chip Cookies
Listen, when you’re making something this delicious and rich, you’re probably not aiming for guilt-free eating, right? That’s totally okay! But since you asked, I always like to include a rough estimate of what you’re looking at per cookie. Remember, because these are such large, bakery-style cookies—we’re scooping about three tablespoons of dough—the numbers reflect a very generous serving. This is based on eating just one of these amazing, fudgy treats. Every recipe has its own variables, so think of these numbers as a helpful guideline rather than a contract!
This estimate assumes the recipe yields the full 18 cookies and uses the optional milk chocolate chunks, which definitely add to the decadence!
- Serving Size: 1 cookie
- Calories: 280
- Sugar: 25g
- Sodium: 150mg
- Fat: 16g
- Saturated Fat: 10g
- Unsaturated Fat: 6g
- Trans Fat: 0g
- Carbohydrates: 33g
- Fiber: 1g
- Protein: 3g
- Cholesterol: 55mg
See? Lots of goodness packed into one perfect, melty bite! If you’ve made any substitutions—like skipping the chunks or using a lighter hand with the sugar—your numbers will shift, of course. For instance, if you swap brown sugar for granulated sugar, you might see a tiny drop in moisture retention, but the sugar value will change. If you want to compare these results with the general understanding of homemade cookie nutrition, you can check out how other classic chocolate chip cookies stack up. But honestly, these are worth every single calorie because they actually work, and you won’t need to bake a batch again for a week!
If you’re looking to dive deeper into tracking the ingredients you used specifically, I found a really helpful resource that breaks down the components used in similar loaded chocolate chip cookies. Enjoy your incredible, thick, homemade treats!
PrintUltra Thick Bakery Style Chocolate Chip Cookies with Crispy Edges
You can make the best homemade chocolate chip cookies that rival any bakery. This recipe yields thick, chewy cookies with gooey centers and perfectly crisp edges. This is the ultimate chocolate chip cookie recipe you will bake repeatedly.
- Prep Time: 20 min
- Cook Time: 13 min
- Total Time: 2 hours 33 min (includes minimum chilling time)
- Yield: 18 large cookies 1x
- Category: Dessert
- Method: Baking
- Cuisine: American
- Diet: Vegetarian
Ingredients
- 1 cup (2 sticks) unsalted butter, melted and slightly cooled
- 1 cup packed light brown sugar
- 1/2 cup granulated sugar
- 2 large eggs, room temperature
- 1 tablespoon vanilla extract
- 2 1/4 cups all-purpose flour
- 1 teaspoon baking soda
- 1/2 teaspoon salt
- 1 1/2 cups semi-sweet chocolate chips
- 1/2 cup milk chocolate chunks (optional, for extra gooey centers)
- Flaky sea salt, for topping (optional)
Instructions
- Whisk the melted butter, brown sugar, and granulated sugar together in a large bowl until completely smooth. This step helps dissolve the sugar for a chewier texture.
- Beat in the eggs one at a time until fully incorporated. Mix in the vanilla extract.
- In a separate bowl, whisk together the flour, baking soda, and salt.
- Gradually add the dry ingredients to the wet ingredients, mixing on low speed until just combined. Do not overmix.
- Fold in the chocolate chips and chunks by hand.
- Cover the dough and chill in the refrigerator for at least 2 hours, or preferably overnight. Chilling is key for thick cookies.
- Preheat your oven to 375 degrees Fahrenheit (190 degrees Celsius). Line baking sheets with parchment paper.
- Scoop the dough into large balls (about 3 tablespoons each) and place them 3 inches apart on the prepared sheets. For extra thickness, stack two dough balls on top of each other.
- Bake for 10 to 13 minutes. The edges should be golden brown and set, but the centers should still look slightly underbaked and puffy.
- Immediately after removing the cookies from the oven, gently tap the baking sheet on the counter two or three times. This helps deflate the centers slightly, creating that desired gooey texture.
- If using, sprinkle flaky sea salt over the tops of the warm cookies.
- Let the cookies cool on the baking sheet for 5 minutes before transferring them to a wire rack to cool completely.
Notes
- For the best gooey center, use a mix of chocolate chips and chopped chocolate bars.
- Browning the butter before melting adds a deeper, nutty flavor to your cookies.
- Do not skip the chilling time; this prevents the cookies from spreading too much during baking, resulting in thick cookies.
- If you want crispier edges, slightly increase the amount of granulated sugar in the recipe.
Nutrition
- Serving Size: 1 cookie
- Calories: 280
- Sugar: 25g
- Sodium: 150mg
- Fat: 16g
- Saturated Fat: 10g
- Unsaturated Fat: 6g
- Trans Fat: 0g
- Carbohydrates: 33g
- Fiber: 1g
- Protein: 3g
- Cholesterol: 55mg