
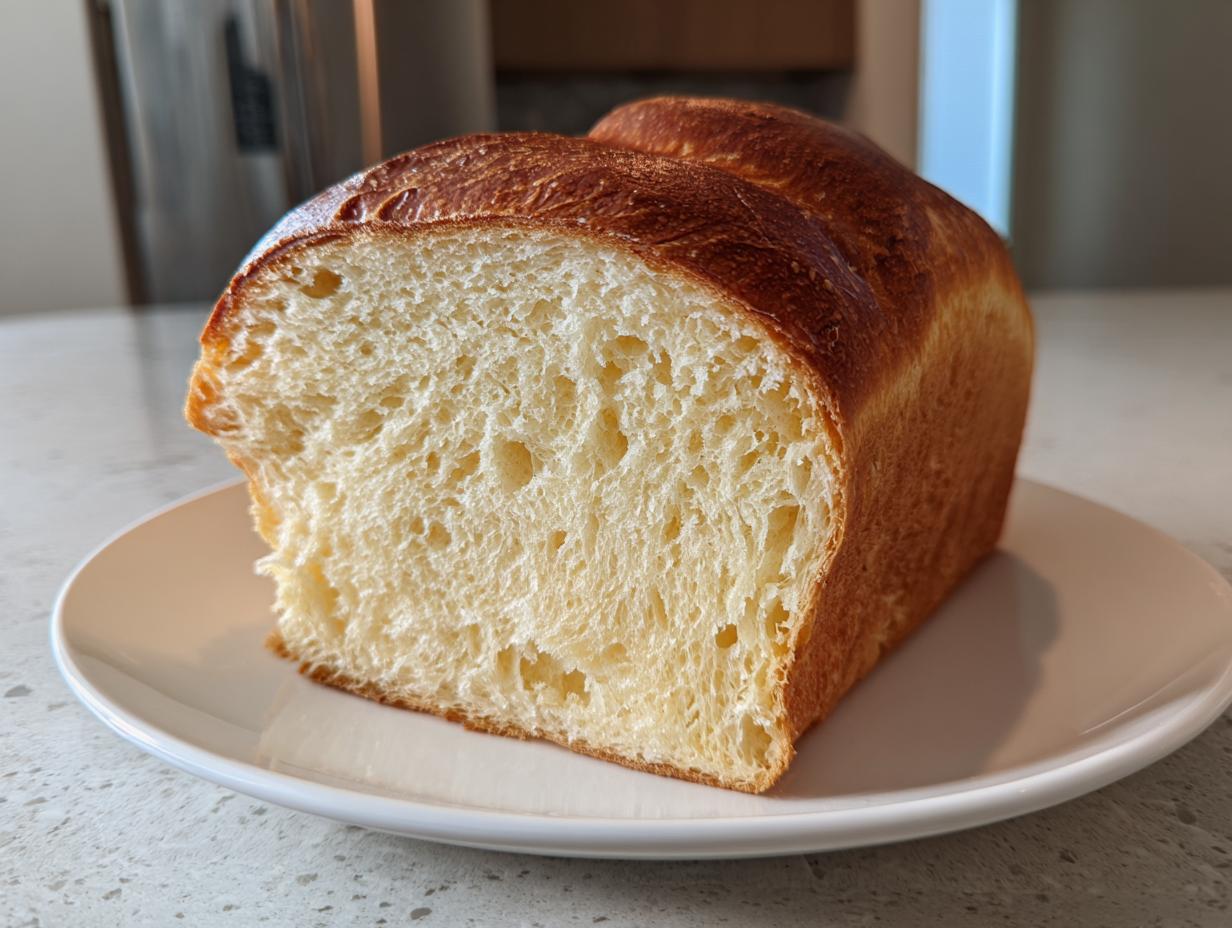
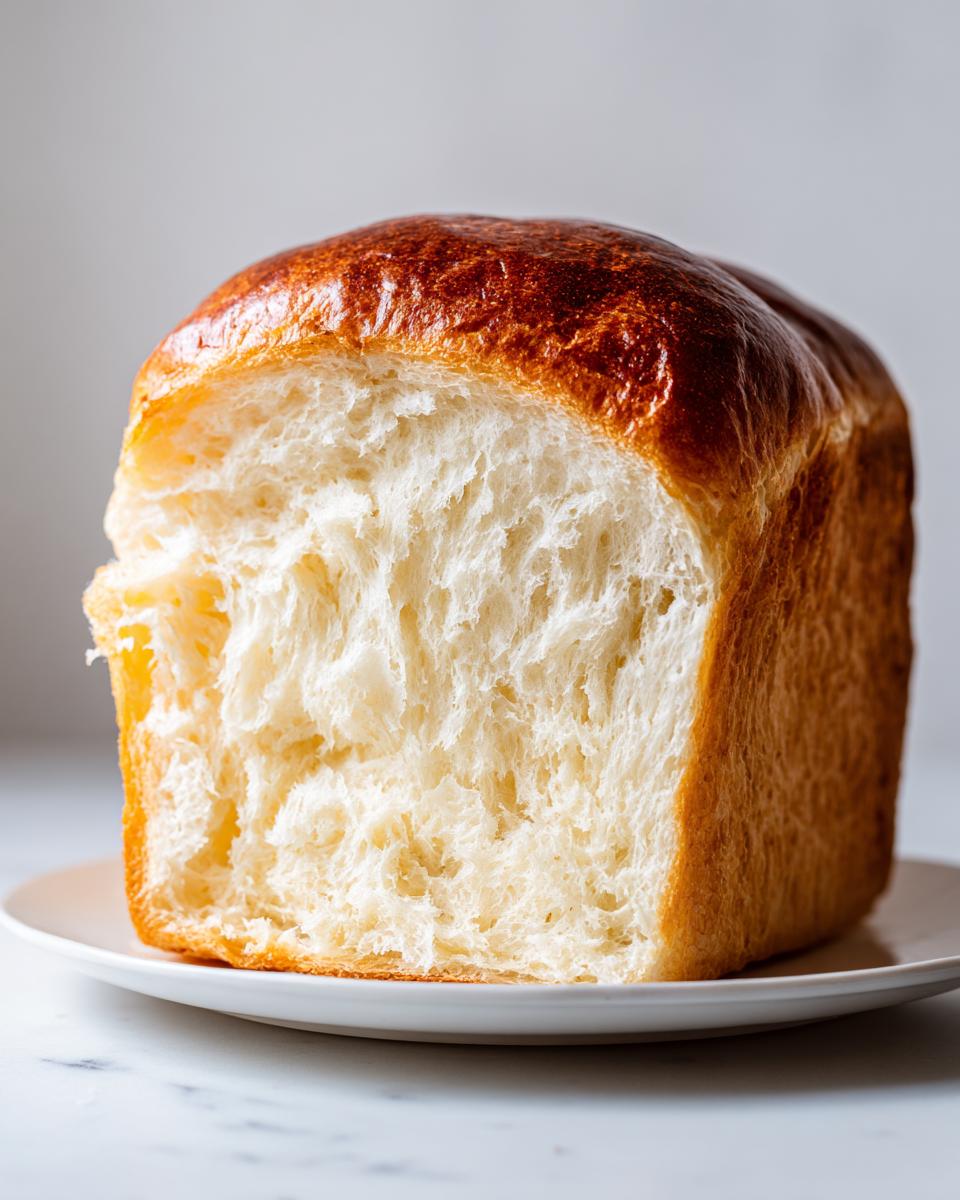
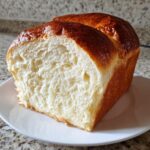
If you’ve ever walked into an Asian bakery and inhaled that impossibly soft, slightly sweet cloud of goodness, then you are chasing the same dream I am! We are finally tackling the queen of soft doughs: true Japanese milk bread, or Shokupan. Seriously, this bread redefines what ‘fluffy’ means; it’s like taking a bite out of a sweet, airy pillow!
Forget everything you think you know about slightly tough homemade loaves. I’m Katherine Hayes, and with my background in Food Science, I’m here to show you the chemical secrets that make this happen, specifically using the famed tangzhong method. By the time we’re done, you’ll have that bakery-style loaf right in your kitchen, I promise!
- Why This Japanese Milk Bread Recipe Delivers Bakery Style Bread At Home
- Gathering Ingredients for Your Fluffy Bread Recipe
- Step-by-Step Instructions for Perfect Milk Bread
- Tips for Success When Baking Milk Bread
- Storage and Reheating Instructions for Tender Crumb Bread
- Variations on Classic Milk Bread
- Frequently Asked Questions About Dairy Enriched Bread
- Nutritional Estimates for Your Homemade Milk Bread
- Share Your Pillow Soft Bread Creations
Why This Japanese Milk Bread Recipe Delivers Bakery Style Bread At Home
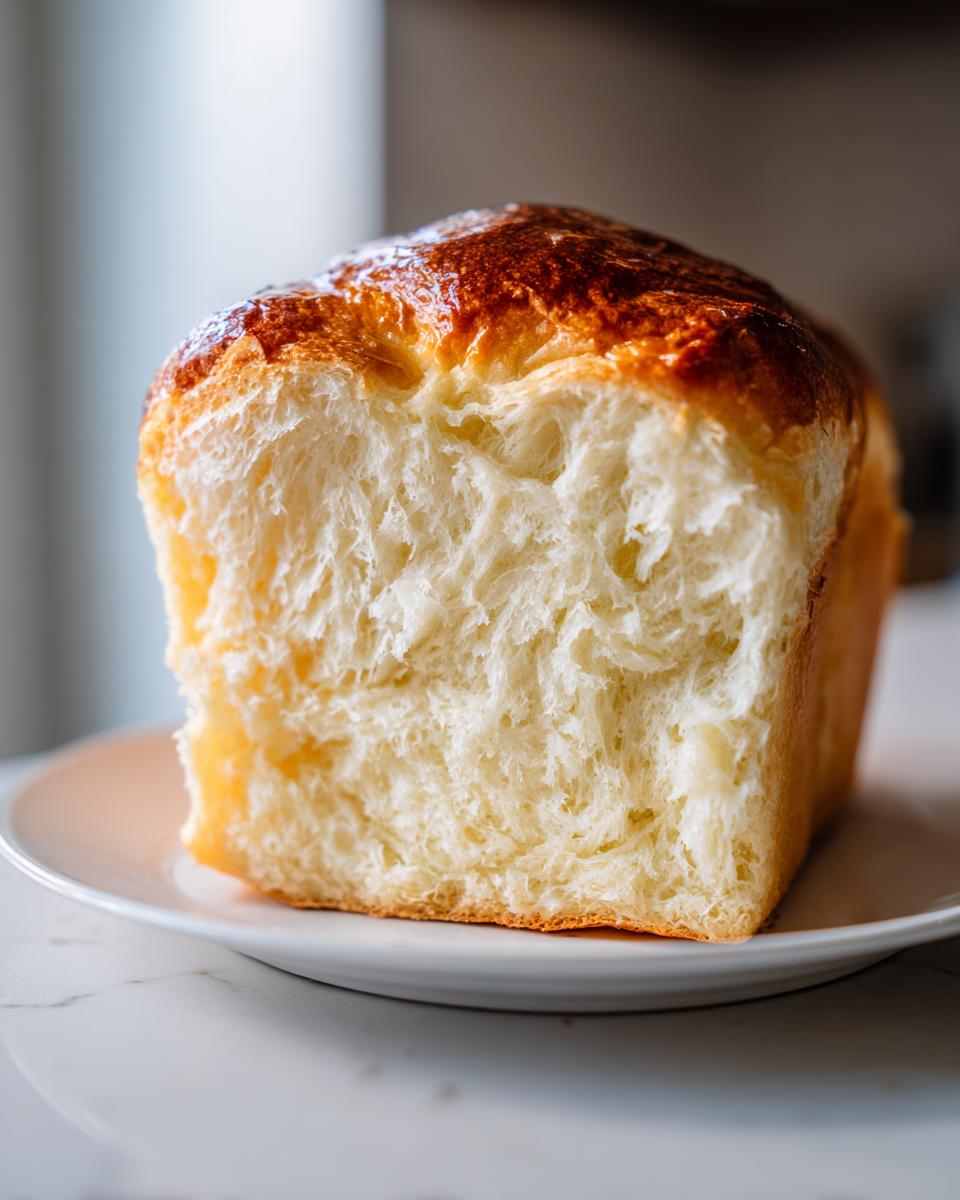
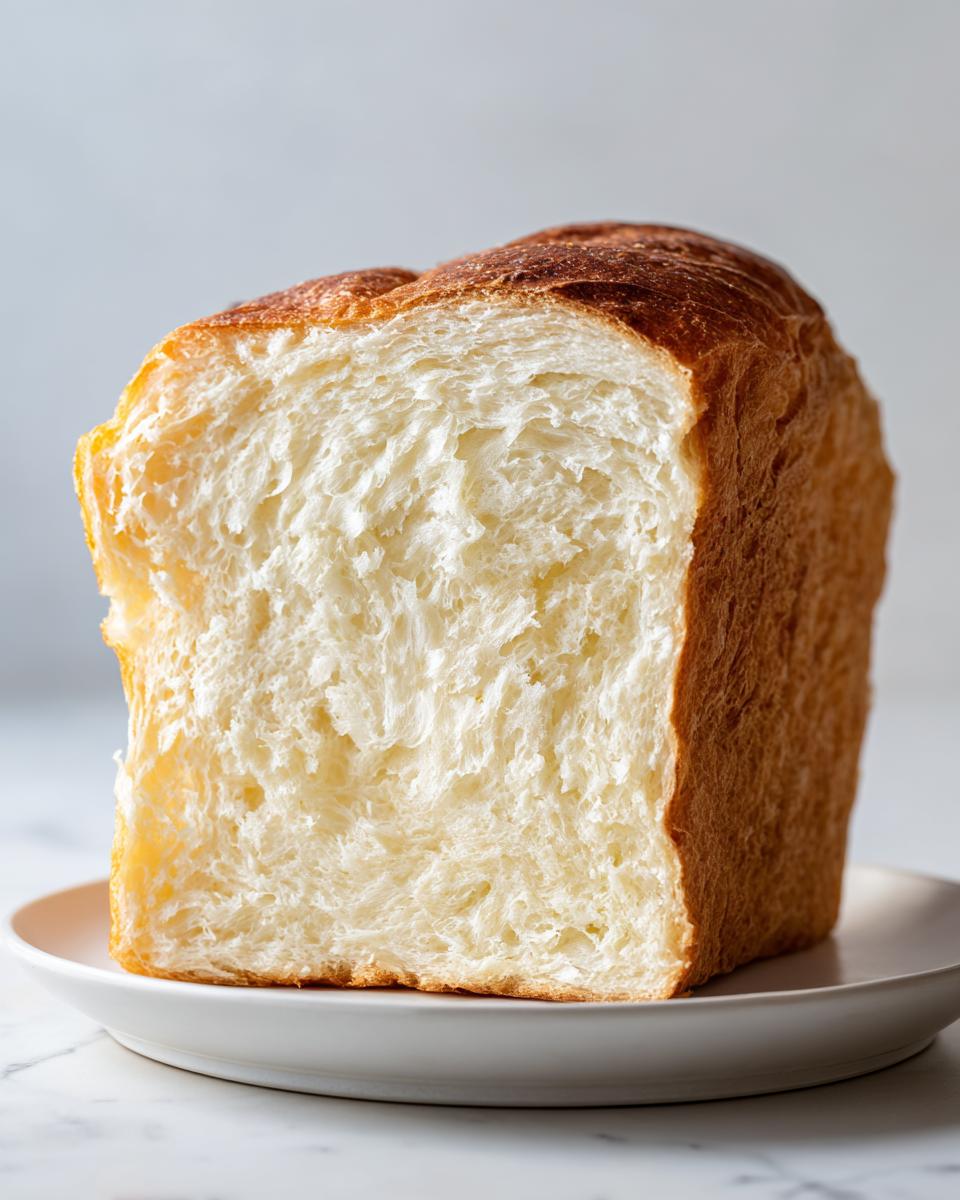
Seriously, the texture you get from this recipe is unmatched. We’re talking about pillow soft bread that stays tender for days—real bakery style bread at home, but made with just a few extra steps. When I first tried baking without the special starter, the results were good, but they were just… bread. After adding the tangzhong, I nearly cried when I pulled that first loaf out; it was impossibly light, like warm cotton! It makes me think of those incredibly soft loaves you see online, sometimes made with condensed milk, like the one I saw on this site.
This method is what takes Japanese shokupan from a standard loaf to a dream loaf. You won’t find this level of tenderness in most standard yeast dough recipes, and that’s because we are doing one thing differently.
The Science Behind the Soft Homemade Bread: Tangzhong Explained
The tangzhong is basically a cooked flour paste. We cook a little flour and milk until the starch gelatinizes. Think of it like this: the cooked starches swell up like tiny little sponges.
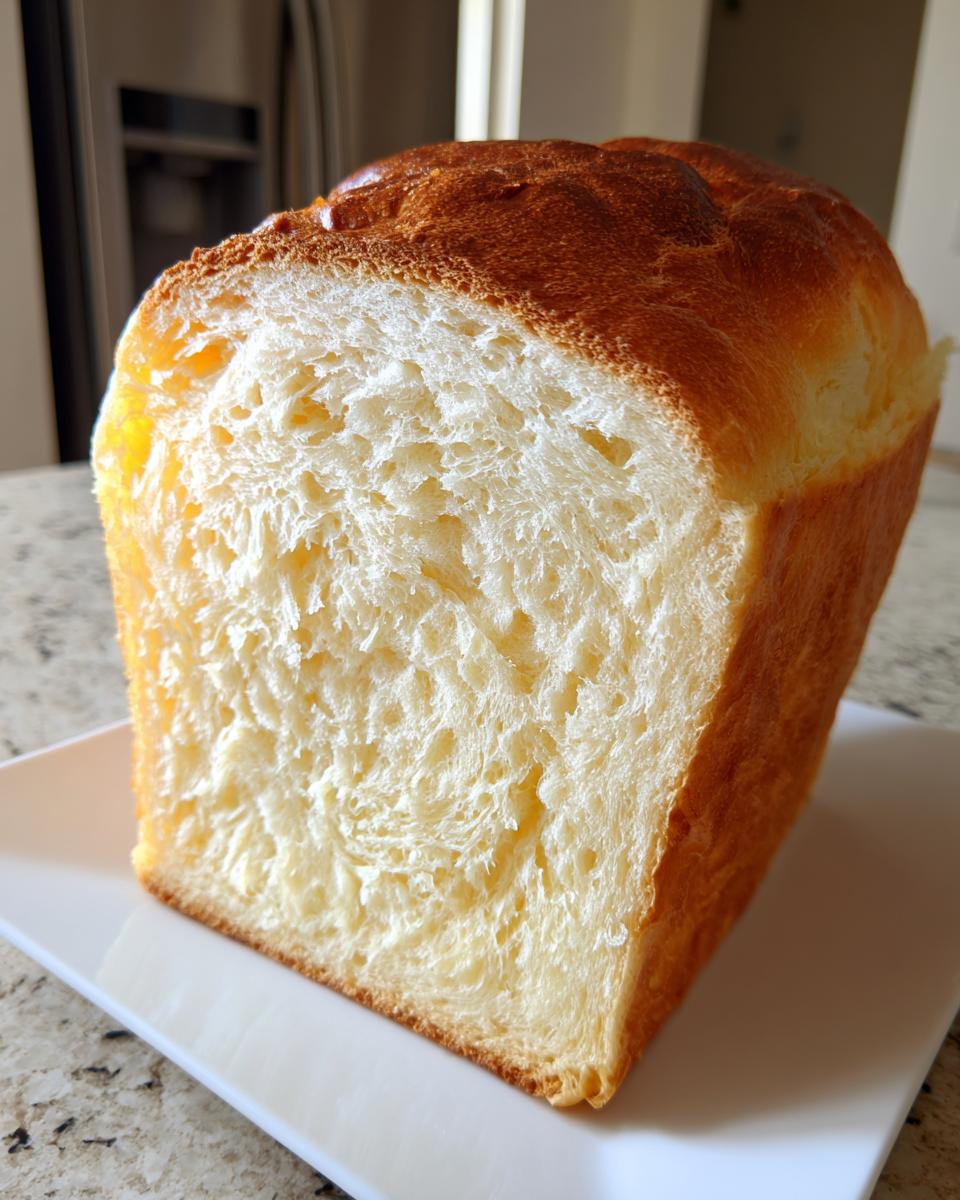
Because of this, the dough can hold way more liquid—and moisture—than it normally could! This is the secret to that tender crumb bread that never dries out. It’s simple science, but it makes all the difference in the world to the final texture.
Gathering Ingredients for Your Fluffy Bread Recipe
Okay, ingredient gathering time! This is where we lay the groundwork for that incredible texture. Because we are using the tangzhong method, we divide our ingredients into two little groups. This keeps things tidy, trust me. Also, since this is a high-hydration dough, you absolutely need to use good quality bread flour. That high protein content is crucial for developing the structure for that beautiful, stretchy dough. You can find some great tips on choosing flour over at The Tasty Vault!
You’ll also notice we need milk warmed up just right. If the milk is too hot, it kills the yeast, and if it’s too cold, the yeast won’t wake up. Lukewarm—think bathwater temperature—is the magic spot!
Ingredients for the Tangzhong Starter
- 60g Milk (for Tangzhong, the cooked starter part)
- 60g Bread Flour (for Tangzhong)
Ingredients for the Main Milk Bread Dough
- 240ml Whole Milk (must be lukewarm)
- 45g Granulated Sugar
- 12g Instant Dry Yeast
- 50g Large Egg (about 1 large egg, whisked gently)
- 360g Bread Flour (the rest of your high-protein flour!)
- 40g Unsalted Butter (make sure this is truly softened, not melted!)
- 6g Salt
Step-by-Step Instructions for Perfect Milk Bread
Now for the fun part—turning those ingredients into something truly magical! Because this milk bread dough relies on that starter, we have to be precise at the beginning, but don’t stress! I promise, if you follow the temperature cues, you’re going to nail this beginner bread baking process. I always make sure to reference good tips, like the ones found when learning about making soft, fluffy loaves, to keep my technique sharp.
Making the Tangzhong and Activating Yeast
First, let’s make that special starter. Whisk your 60g of milk and flour together until there are no lumps, then cook it over medium-low heat. You absolutely must stir constantly until it gets really thick—it should be a thick paste, and ideally, it hits about 65°C (149°F). Don’t let it boil! Once it’s thick, pull it off the heat, cover the surface tightly with plastic wrap to stop a skin from forming, and let it cool completely to room temperature. Patience here matters for trust! While that cools, gently mix your lukewarm whole milk, sugar, and yeast in a big bowl. If it gets foamy after about 5 to 10 minutes, your yeast is awake and ready to work!
Mixing and Kneading Your Milk Bread Dough
To the foamy yeast mixture, whisk in your cooled tangzhong starter and the whisked egg. Now, slowly add the remaining bread flour and the salt. Mix it until it’s just a shaggy ball—don’t overmix yet! Then, add that softened butter piece by piece as you continue kneading. You can use a sturdy spoon or your stand mixer hook, but you need to work this for a solid 10 to 15 minutes. We are aiming for the windowpane test. That means you stretch a small dough piece really thin, and you should be able to see light through it without it tearing immediately. That elasticity is key to that tender crumb bread! If you want more insight on flour interaction, check out the great stuff they share over at Red Star Yeast.
Rising, Shaping, and Baking the Best Fluffy Loaf
Put your beautifully kneaded dough into a lightly oiled bowl, turning to coat, and let it rise somewhere warm until it doubles—that usually takes about 1 to 1.5 hours. Once doubled, gently punch the air out. Divide the dough into three equal pieces. Shape those pieces into tight little balls and let them rest, covered, for 15 minutes—this relaxes the gluten! Then, roll each into a log and gently place the three logs side-by-side into your greased 9×5 inch loaf pan, making sure the seams are facing down. Cover it again and let it have its second rest until it crests about an inch over the rim, usually 45 to 60 minutes.
Preheat your oven to 175°C (350°F). Bake this lovely loaf for 30 to 35 minutes. I always check the internal temp—you want it to hit 93°C (200°F) for doneness. Get it out of the pan right away and let it cool fully on a rack before slicing, otherwise, you’ll smash that perfect crumb! Don’t worry if you aren’t used to this timing; this process just takes practice, but sticking to these rise times is what ensures results like the ones you see shared online.
Tips for Success When Baking Milk Bread
You’ve done the hard work—the mixing, the long knead—and now we want to make sure that beautiful loaf looks as good as it tastes! One thing I always do for special occasions or when I want that gorgeous, glossy look you see in bakeries is use an egg wash. It’s simple but makes a huge difference in how your finished milk bread shines.
Also, and this is just as important as the windowpane check: let it cool completely! I know it’s torture when the smell of fresh bread is filling your kitchen, but slicing it hot lets all that beautiful moisture escape too fast. You need it to set up so you get that iconic soft, shreddable texture.
Achieving the Perfect Crust on Your Milk Bread
For that extra bakery sheen, I highly recommend brushing the top of your loaf with an egg wash right before it goes into the oven. You just beat one egg with a teaspoon of water until it’s combined well. Brush it lightly right over the top surface, and watch it transform into a beautiful golden color as it bakes! If you don’t care about the super shiny look, a simple milk brush works too, but that egg wash is my secret weapon when I want that next-level presentation. You can even check out some other simple loaf tips over at Cooking in English!
Storage and Reheating Instructions for Tender Crumb Bread
Okay, you’ve mastered the bake, and now you want to keep this incredible texture around for more than one day, right? That’s the beauty of this bread; it actually stays surprisingly soft for several days if you treat it right! My biggest storage tip, which I learned from years of trying to keep my test loaves perfect, is simple: tight wrapping is your best friend.
Don’t let the air hit that gorgeous crumb! Once the loaf is completely cool—and I mean totally cool, otherwise you’ll trap steam and get sogginess—wrap it tightly in plastic wrap first. Then, I always pop that plastic-wrapped loaf into a large zip-top bag or an airtight container. This locks in the moisture the tangzhong worked so hard to create. Stored this way on the counter, it’s wonderful for three to four days.
For the best possible experience when reheating (especially if you want that ‘fresh from the oven’ feel), you just need a quick blast. If you have a slice, wrap it loosely in a slightly damp paper towel and microwave it for about 10 to 15 seconds. It makes the bread steamy and soft again! If you have the whole loaf, pop it into a 300°F (150°C) oven for about 5 minutes. It warms up gently and tastes glorious—perfect for that morning toast!
And if you’re ever wondering which way you should go next time, perhaps try a variation like the one I saw that uses sweetened condensed milk; it sounded like a wonderful way to get an even sweeter, richer loaf, like the one Amelia suggests here!
Variations on Classic Milk Bread
Once you master this beautiful milk bread technique, you’ll realize how versatile this dough is! While the tangzhong method provides that classic, light texture we all love, you can definitely play around with it. Some home bakers prefer an even sweeter profile, and they sometimes swap out some of the regular sugar for a condensed milk bread recipe, which adds extra richness and sweetness right into the mix.
If you’re curious about other dairy-rich favorites, you might enjoy looking into recipes like Amish White Bread, which uses a slightly different approach to achieving a soft loaf structure—it’s always fun to compare methods! You can check out that version here.
Honestly, though, this Japanese shokupan base is so perfect, I rarely stray. But experiment with additions like lemon zest or a touch of honey next time you make it!
Frequently Asked Questions About Dairy Enriched Bread
Bread baking, especially something as delicate as this—it always brings up questions! Don’t worry if you’re new to this; mastering these soft yeast dough recipes is really satisfying once you get the hang of it. I’m happy to clear up some confusion I often hear from folks just starting their journey into beginner bread baking.
Can I skip the tangzhong when making this milk bread?
You technically *can*, but I really, sincerely advise against it if you want that authentic texture. If you skip it, you’ll end up with a lovely, slightly sweet dairy loaf, but it won’t have that incredible, super-soft, shreddable quality of true Japanese shokupan. It will dry out much faster, too. The tangzhong is doing the heavy lifting for moisture retention!
What is the best flour for a fluffy bread recipe?
For any fluffy bread recipe, you absolutely must use high-protein bread flour. Don’t substitute all-purpose flour or you risk a denser result. Bread flour has a higher protein content, which means when you knead it, you develop stronger gluten strands. Those strong strands are what stretch and capture the gases produced by the yeast, giving you that high rise and that famously light interior crumb we are chasing!
Can I use this dough for sweet rolls instead of a loaf?
Oh yes, you totally can! This recipe is fantastic for cinnamon rolls or simple dinner rolls. The flavor is perfect. If you use this dough for smaller rolls, you’ll need to reduce the final rising time significantly. Small rolls proof much faster because they are smaller pockets of dough, so keep an eye on them after shaping, maybe 25 to 35 minutes is all they need before baking. For more inspiration on shaping, take a peek at what they share over at Rebecca’s Recipes!
Nutritional Estimates for Your Homemade Milk Bread
I know some of you are as curious about the science behind the baking as you are about the taste, and that’s fair! While my passion leans toward texture and flavor—and the joy of baking for people—I also pulled the standard nutritional estimates for this wonderfully rich loaf. Remember, since we are using whole milk, butter, and sugar, these numbers reflect a true, decadent, dairy-enriched bread!
Keep in mind that these figures are theoretical, calculated based on standard brand ingredients for a single slice. If you swap out butter for oil, or use skim milk, your personal numbers will obviously shift! I always recommend checking the specific brand labels if you have very strict dietary needs.
For a deeper dive into the components of this kind of baking, you can check out some of the detailed analyses of classic loaf recipes over at Mushroom Salus.
Here is what you can generally expect per serving:
- Serving Size: 1 slice
- Calories: 180
- Fat: 4g
- Saturated Fat: 2g
- Trans Fat: 0g
- Cholesterol: 25mg
- Sodium: 150mg
- Carbohydrates: 30g
- Fiber: 1g
- Sugar: 6g
- Protein: 6g
It’s a treat, for sure, but one that gives you a great blend of energy for the morning! Enjoy it sliced thick for toast—you deserve it after making such a beautiful loaf!
Share Your Pillow Soft Bread Creations
Wow, you made it! You tackled the tangzhong, you nailed the windowpane test, and now you have the fluffiest loaf sitting on your counter. Doesn’t that smell incredible? I just can’t get over how much better homemade milk bread is compared to anything store-bought!
I truly hope this recipe gives you that bakery-quality result you were hoping for. Seeing my readers succeed in the kitchen is why I built Frosted Fancies, so please, don’t be shy!
If this loaf turned out exactly how you wanted—those beautiful, tall sides and that unbelievably soft homemade bread texture—I would absolutely love for you to come back here and leave a star rating below. It helps everyone else feel confident trying this technique.
And seriously, snap a picture of your finished bread for toasts and sandwiches! Seeing your creations is the best part of my day. Tag me on social media or send a photo over through the contact page here so I can see your results. Happy baking, you’ve earned that first warm slice!
PrintBakery-Quality Japanese Milk Bread (Shokupan) with Tangzhong
Learn to make incredibly soft, fluffy, and slightly sweet Japanese Milk Bread at home using the tangzhong method. This recipe yields a tender crumb perfect for toast and sandwiches.
- Prep Time: 45 min
- Cook Time: 35 min
- Total Time: 3 hours 0 minutes
- Yield: 1 loaf 1x
- Category: Baking
- Method: Baking
- Cuisine: Japanese
- Diet: Vegetarian
Ingredients
- 60g Milk (for Tangzhong)
- 60g Bread Flour (for Tangzhong)
- 240ml Whole Milk (lukewarm)
- 45g Granulated Sugar
- 12g Instant Dry Yeast
- 50g Large Egg (about 1 large egg)
- 360g Bread Flour (for dough)
- 40g Unsalted Butter (softened)
- 6g Salt
Instructions
- Prepare the Tangzhong: Whisk the 60g milk and 60g bread flour together in a small saucepan until smooth. Cook over medium-low heat, stirring constantly, until the mixture thickens significantly and reaches 65°C (149°F). It should resemble a thick paste. Remove from heat, cover the surface with plastic wrap to prevent a skin from forming, and let it cool completely to room temperature.
- Activate the Yeast: In a large bowl, combine the lukewarm whole milk, sugar, and instant dry yeast. Let this mixture sit for 5 to 10 minutes until foamy.
- Mix the Dough: Add the cooled tangzhong and the egg to the yeast mixture. Whisk briefly to combine. Add the 360g bread flour and salt. Mix with a wooden spoon or stand mixer hook attachment until a shaggy dough forms.
- Knead: Turn the dough onto a lightly floured surface or continue mixing with the dough hook on low speed. Knead for about 5 minutes until the dough starts to come together.
- Incorporate Butter: Add the softened butter to the dough. Continue kneading for another 10 to 15 minutes until the dough is smooth, elastic, and passes the windowpane test (you can stretch a small piece thin enough to see light through it without tearing).
- First Rise: Place the dough in a lightly oiled bowl, turning to coat. Cover the bowl and let it rise in a warm place until doubled in size, about 1 to 1.5 hours.
- Shape the Loaf: Gently punch down the risen dough. Divide it into three equal pieces. Shape each piece into a tight ball. Let the balls rest, covered, for 15 minutes.
- Final Shaping: Roll each rested ball into a log shape. Place the three logs side-by-side into a greased 9×5 inch loaf pan, ensuring the seams face down.
- Second Rise: Cover the loaf pan loosely and let it rise again in a warm spot until the dough has nearly doubled and crests about 1 inch over the rim of the pan, about 45 to 60 minutes.
- Bake: Preheat your oven to 175°C (350°F). Bake for 30 to 35 minutes, or until the top is golden brown and the internal temperature reaches 93°C (200°F).
- Cool: Immediately remove the bread from the pan and let it cool completely on a wire rack before slicing to maintain the soft, tender crumb.
Notes
- For an extra shiny crust, brush the top of the loaf with an egg wash (1 egg beaten with 1 teaspoon of water) just before baking.
- This bread stays soft for several days when stored tightly wrapped at room temperature.
- If you prefer a slightly sweeter loaf, increase the sugar in the main dough by 10g.
Nutrition
- Serving Size: 1 slice
- Calories: 180
- Sugar: 6
- Sodium: 150
- Fat: 4
- Saturated Fat: 2
- Unsaturated Fat: 2
- Trans Fat: 0
- Carbohydrates: 30
- Fiber: 1
- Protein: 6
- Cholesterol: 25