

Hello there! Welcome to Frosted Fancies. I’m so glad you found your way here. If you’ve ever brought home Chicken Parmesan from a great Italian restaurant and wondered how they ever keep that crust so perfectly crisp under the cheese and sauce, you are in exactly the right place! That’s the main problem we solve today.
When I developed this chicken parmesan recipe, my goal was to create something that tastes like it took all day but only took about 35 minutes of active time. After years spent professionally developing recipes and understanding the science behind texture in my test kitchen, I can promise you that this method guarantees juicy chicken inside and that gorgeous, non-soggy crunch outside. Forget dry cutlets; we are making restaurant-style perfection tonight!
- Why This is the Best Chicken Parmesan Recipe You Will Make
- Gathering Ingredients for Your Chicken Parmesan Recipe
- Step-by-Step Instructions for Your Homemade Chicken Parm
- Tips for Restaurant Style Chicken Parm Success
- Storage and Reheating Your Chicken Parmesan Recipe
- Serving Suggestions for a Complete Chicken Parmesan Dinner Ideas
- Frequently Asked Questions About This Easy Chicken Parmesan Recipe
- Nutritional Estimates for Your Chicken Parmesan Recipe
- Share Your Homemade Chicken Parm Creation
Why This is the Best Chicken Parmesan Recipe You Will Make
I know, everyone claims they have the best recipe out there, but I truly believe this one delivers big-time flavor without needing a culinary degree or hours slumped over the stove. You deserve amazing food that works! If you check out what others are saying about homemade versions when they finally nail the crisp factor, you’ll see this method shines.
- Guaranteed Juicy Chicken Parmesan thanks to precise pounding and cooking times.
- The ultimate Crispy Chicken Parmesan crust that stands up beautifully to the sauce.
- Flexible cooking choices: Maximum crisp via pan-frying, or a great oven-crisped option!
- It’s a true Weeknight Italian Dinner powerhouse—fast and deeply satisfying.
Achieving Ultimate Crispiness Every Time
My secret weapon for that amazing crunch is skipping standard breadcrumbs entirely. We use Panko because those flakes are lighter and absorb less oil, which helps them crisp up beautifully. But here’s the real trick: after dredging it through the seasoned Panko mixture, you have to press. Really press that coating onto the chicken breast. This forces it to adhere, and that firm bond is what keeps your crust intact when the sauce comes near.
Gathering Ingredients for Your Chicken Parmesan Recipe
Alright, let’s talk about what you need for this sensational chicken parmesan recipe. Since this is a classic Italian dish, quality really matters, especially for the sauce! We’re using simple pantry staples, but that Panko and Parmesan blend in the breading is key to making this a fantastic Weeknight Italian Dinner winner. You can see the full list of what you need right above this section!
When you’re shopping, remember that the better your marinara sauce is, the better your final dish will taste. I usually grab a jar of good quality crushed tomatoes and doctor it up at home, but if you find a great ready-made sauce, go for it!
Ingredient Notes and Substitutions for Juicy Chicken Parmesan
To ensure we get that trademark Juicy Chicken Parmesan, take a minute to prep your chicken correctly—pounding it evenly to about half an inch is non-negotiable! This stops the thinner parts from drying out while the thicker parts cook through.
Also, please try to use fresh mozzarella if you can find it. It melts into this beautiful, creamy blanket over the top, whereas pre-shredded stuff often has anti-caking agents which can make the cheese look oily instead of gooey. Remember that detailed tip in the notes about using a wire rack if you decide to bake your chicken parmesan recipe? That little bit of air flow makes a huge difference to that crust!
Step-by-Step Instructions for Your Homemade Chicken Parm
Now we get to the fun part! Making this spectacular chicken parmesan recipe happen. Before we even think about breading, we have to deal with the thickness. Remember how I mentioned that professional kitchens focus on consistency? Pounding your chicken breasts to a uniform 1/2-inch thickness is so important. It ensures that every single part cooks quickly and stays juicy right up until the moment we hit it with that glorious cheese topping. You don’t want one bite to be chewy and the next dry, right? Set up your three stations—flour, egg wash, and that amazing Panko mixture—and let’s get building!
The Critical Dredging Process for a Perfect Crust
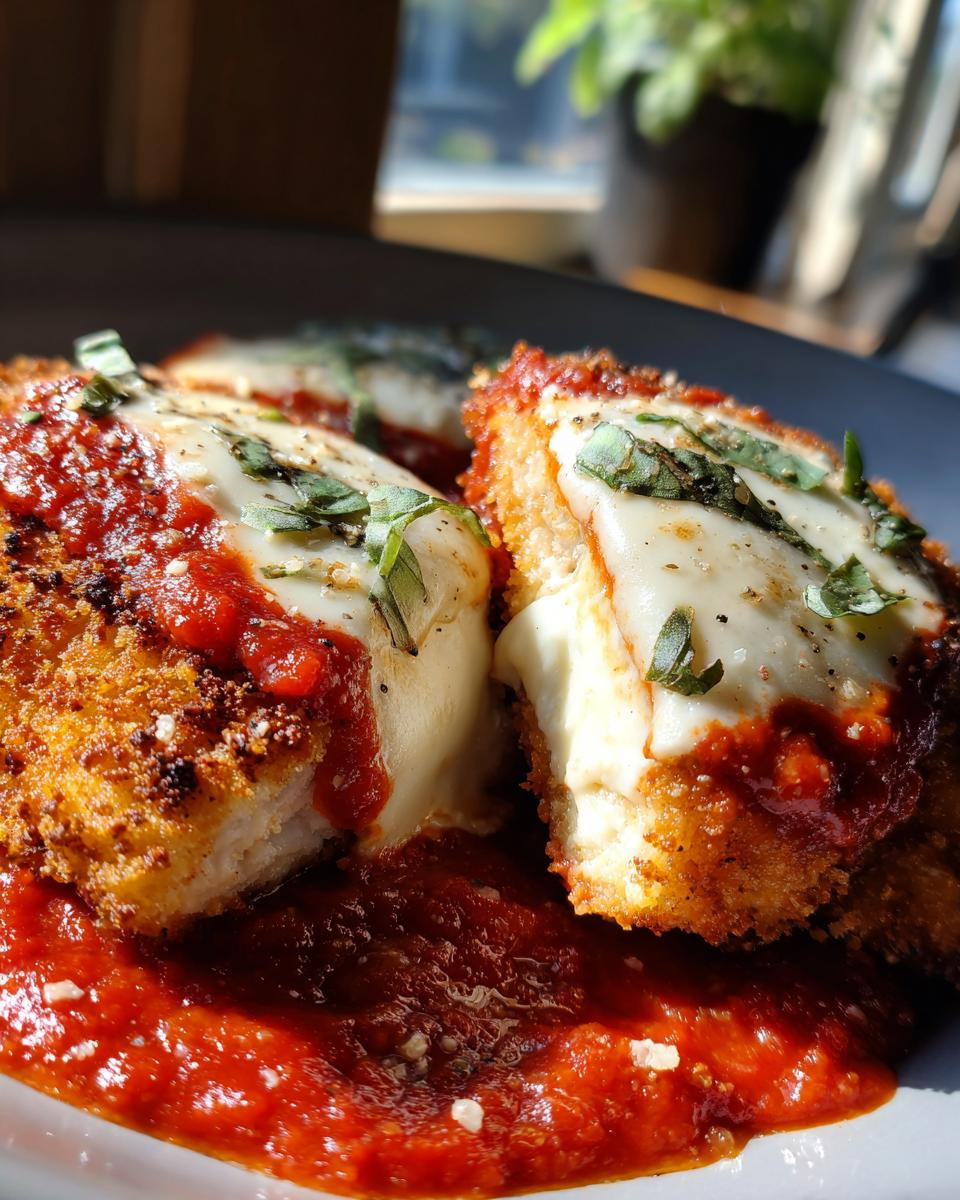
This part requires confidence! We use a classic three-step process: first, dust it lightly in the flour—shake off the excess so it’s barely coated. Next, a quick dip in the egg wash; let that drip back into the bowl. Finally, press that cutlet firmly into the seasoned Panko mixture. I mean *press it*! You want that breading to really stick tight to the meat. This firm adhesion is what prevents the crust from breaking away when the gooey mozzarella melts on top later. Don’t be shy about coating every nook and cranny.
Cooking Methods: Pan-Fried vs. Oven-Crisped for this Chicken Parmesan Recipe
Here is where you choose your destiny! For the real, authentic, maximum-crisp experience, you’ll want to pan-fry. Heat your olive oil on medium-high until it shimmers—that’s the cue. Fry those babies for about 3 to 4 minutes per side until they are deeply golden brown. If you are skipping the fry for a quick weeknight option, lightly spray those breaded wonders with cooking spray and pop them into a 400°F oven for about 15 minutes, flipping halfway.
Either way, once the chicken is cooked through and beautifully golden, you’ll remove it and get ready to assemble the rest of this incredible chicken parmesan recipe. If you want to see how other professional recipe developers approach getting that crunch, check out some of these great ideas on getting the perfect bake!
Tips for Restaurant Style Chicken Parm Success
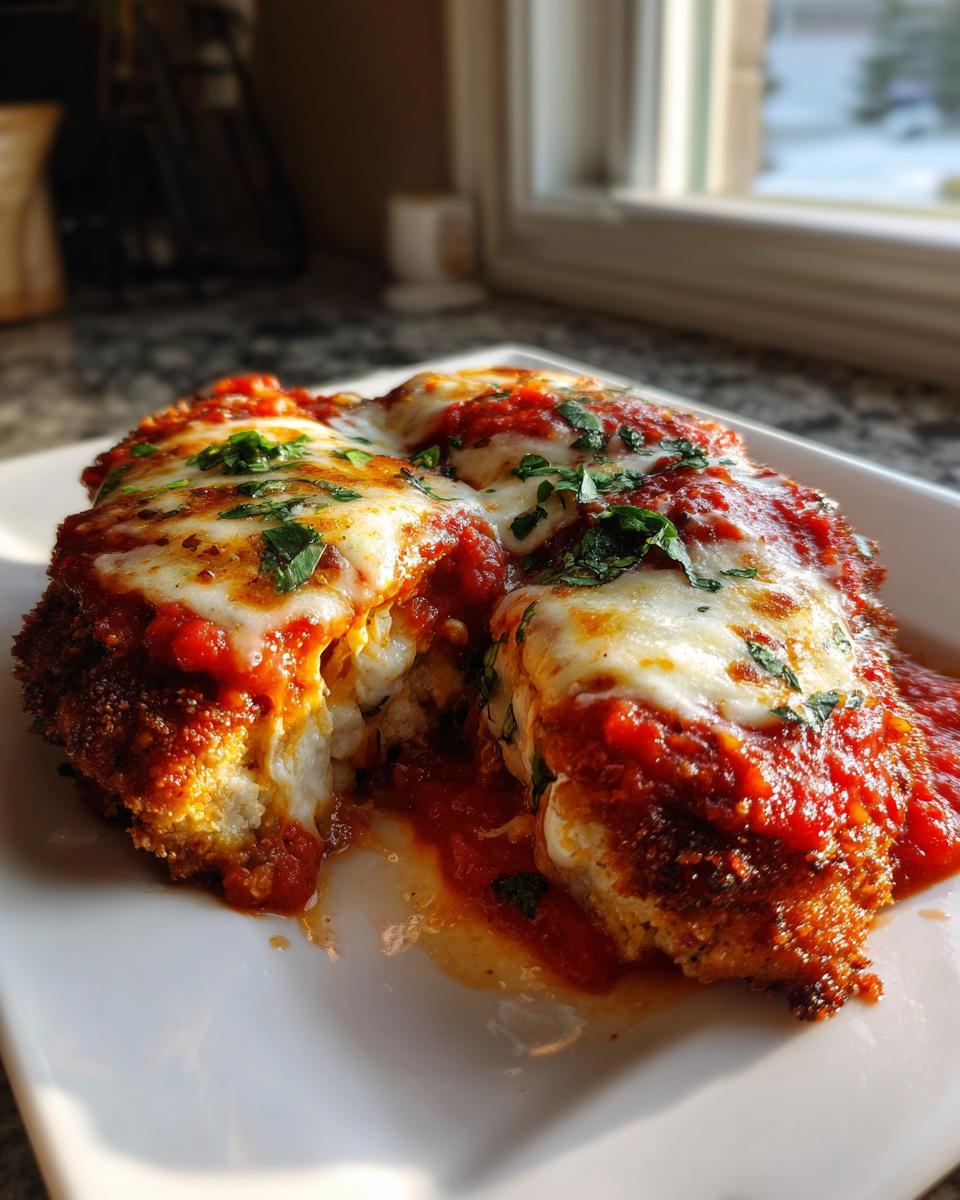
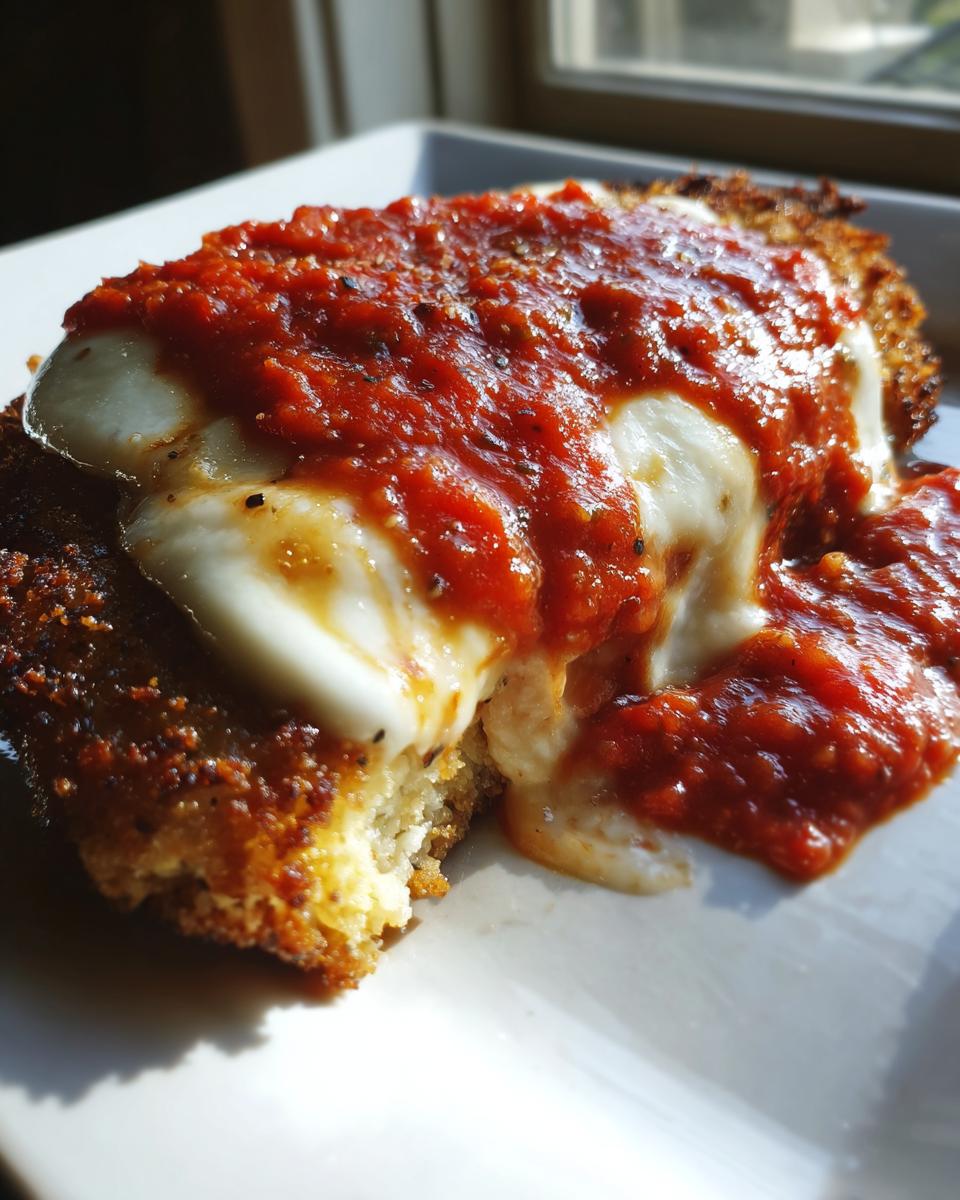
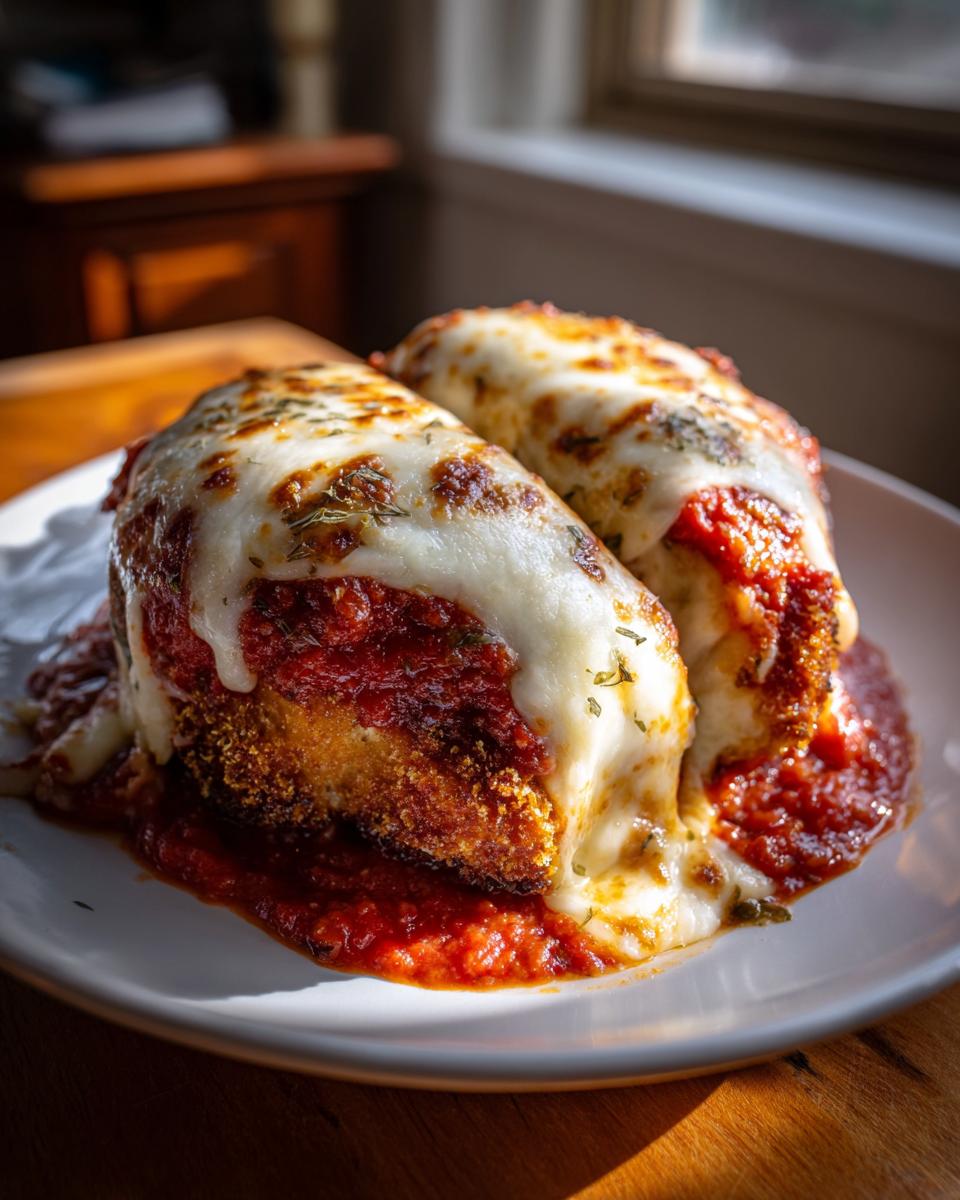
We are so close to that restaurant-quality experience, and these final assembly tips are where we seal the deal! The absolute most important thing now is your broiler setup. Put your baking dish on the highest rack possible—I mean right up near the heat source! I learned this the hard way years ago; I tried to rush the process and left the dish in the middle of the oven. I ended up with beautifully melted but totally pale mozzarella. So sad! You need that intense, direct heat for that perfect golden brown finish.
Another thing that professional kitchens nail is sauce control. When you’re layering, remember you’re making a casserole here, not a soup! Use just enough marinara to coat the chicken before the cheese goes on. Too much sauce, and boom, you’ve got a soggy mess. Spread just a thin layer on the bottom of your dish, spoon a moderate amount over the cutlet, then pile on that wonderful cheese topping. You can see some wonderful plating ideas over here as well.
And please, whatever you do, don’t crowd the pan when you pan-fry! If the cutlets are too close together, the temperature of the oil drops, and instead of sizzling beautifully, they steam. Steamed breading equals sadness. Always work in batches so you get that even golden color you crave before going under the broiler, just like they show in these great tips from other home cooks!
Storage and Reheating Your Chicken Parmesan Recipe
Okay, let’s be real—leftovers of this incredible chicken parmesan recipe are a gift, but we have to treat them gently if we want to keep that crunch!
If you have any leftover Homemade Chicken Parm, the best way to save it is to let the cutlets cool completely first, then store them in an airtight container in the fridge. Please, please, please skip the microwave entirely if you value crispiness. Microwaving is the enemy of a good coating!
For reheating that brings back the glory, you want dry heat. Pop those cutlets onto a small wire rack set over a baking sheet—this is the secret again! Reheat them in a 400°F oven or, even better, an air fryer for about 8 to 10 minutes. That blast of dry heat revives that beautiful crust we worked so hard to create!
Serving Suggestions for a Complete Chicken Parmesan Dinner Ideas
So, you have this glorious, cheesy masterpiece on your plate. What now? You need sides that complement the richness without weighing down the whole meal. For classic comfort, you can never go wrong with spaghetti coated lightly in that extra marinara sauce, or maybe some crusty garlic bread for dipping!
But if you want to balance out all that savory goodness, think green! A bright, slightly acidic Caesar salad or some simple sautéed green beans tossed with a tiny bit of lemon zest are fantastic Chicken Parmesan Dinner Ideas. I actually love serving mine with roasted broccoli to add a little crunch that contrasts nicely with the soft cheese. You can find some inspiration for easy sides over here. It makes a complete, beautiful plate!
Frequently Asked Questions About This Easy Chicken Parmesan Recipe
It is totally normal to have questions, especially when you are chasing that perfect flavor and texture profile for this chicken parmesan recipe!
We want you to feel totally confident making this tonight. I’ve tried to address just about every potential sticking point in the steps above, but here are a few more things I hear often about making great Italian comfort food at home.
Can I make this Chicken Parmesan Recipe ahead of time?
This is a tricky one because crispness is the goal! You absolutely shouldn’t dredge or fully cook the chicken ahead of time if you want that perfect crust. However, here’s a great shortcut: you can pound the chicken breasts into shape, lightly season them, and keep them ready in the fridge for up to a day. You can also make your marinara sauce a day or two ahead—that just lets the flavors meld nicely!
When you are ready to eat, set up your three breading stations quickly and cook immediately. The dredging process itself is fast, so doing that right before the oil hits the pan is how you keep this an Easy Chicken Parmesan meal.
How do I ensure my chicken stays juicy?
The answer boils down to muscle fiber management, which sounds fancy, but it’s actually simple! The most important thing is uniformity. If one end of your chicken breast is super thin and the other is fat, the thin end is going to dry out before the thick end finishes cooking. So, always take the time to pound everything to that even 1/2-inch thickness we talked about.
Also, remember that the final step under the broiler is just for the cheese. If you cook the chicken fully—like, to 165°F internally—before it even hits the sauce, it will be overcooked by the time the mozzarella melts. You only need the chicken to be about 90% done before you top it and broil it to perfection. That final surge of heat gets the cheese bubbly without drying out your chicken parmesan recipe cutlets.
If you are looking for ways to make a lighter version of this classic, I highly recommend checking out some tips on getting that crispiness without frying, which will also help keep things lighter! If you want more ideas on serving this wonderful dish, check out these tips for serving it up right!
Nutritional Estimates for Your Chicken Parmesan Recipe
I always encourage you to enjoy Italian comfort food without worrying too much, but since we are talking about making truly great food, here are the estimated nutritional facts for one serving of this fantastic chicken parmesan recipe. These are based strictly on the ingredients listed in the recipe above!
- Serving Size: 1 cutlet
- Calories: 550
- Protein: 45g
- Fat: 28g (Saturated Fat: 12g)
- Carbohydrates: 35g (Fiber: 3g)
Just remember, these numbers will shift a little bit depending on the brand of marinara sauce you use or exactly how much mozzarella you decide to pile on top—and honestly, who measures that part perfectly, right?
Share Your Homemade Chicken Parm Creation
That’s it! You’ve conquered the ultimate Chicken Parmesan Recipe. Now, the best part of building this community here at Frosted Fancies is seeing what you all create!
If you made this for dinner tonight, please take a second to come back and leave a star rating—I’m aiming for five stars for this one! Let me know in the comments if you went the pan-fried route for that ultimate crunch or if you chose the oven-crisped alternative. Tag us on social media with your cheesy, saucy masterpieces; I absolutely love seeing them! You can see some wonderful finished plates shared by others. Happy cooking, everyone!
PrintThe Ultimate Crispy Chicken Parmesan Recipe (Pan-Fried or Baked)

Welcome! You deserve restaurant-quality Chicken Parmesan at home. This recipe guarantees juicy chicken with a perfectly crispy crust, smothered in rich marinara and melted mozzarella. It is simple enough for a weeknight dinner but special enough for guests.
- Prep Time: 15 min
- Cook Time: 20 min
- Total Time: 35 min
- Yield: 4 servings 1x
- Category: Dinner
- Method: Pan-Frying and Broiling
- Cuisine: Italian-American
- Diet: Meat
Ingredients
- 4 boneless, skinless chicken breasts (about 6 oz each)
- 1 cup all-purpose flour
- 2 large eggs, lightly beaten
- 1 tablespoon water
- 1 1/2 cups Panko breadcrumbs
- 1/2 cup grated Parmesan cheese (for breading)
- 1 teaspoon garlic powder
- 1/2 teaspoon dried oregano
- 1/2 teaspoon salt
- 1/4 teaspoon black pepper
- 1/4 cup olive oil (for pan-frying) OR cooking spray (for baking)
- 2 cups quality marinara sauce
- 8 ounces fresh mozzarella cheese, sliced or shredded
- 1/4 cup grated Parmesan cheese (for topping)
- Fresh basil, chopped (for garnish)
Instructions
- Prepare the Chicken: Place each chicken breast between two sheets of plastic wrap. Pound the chicken to an even 1/2-inch thickness using a meat mallet. Season both sides lightly with salt and pepper.
- Set up the Breading Stations: Prepare three shallow dishes. In the first, place the flour. In the second, whisk the eggs and water. In the third, combine the Panko breadcrumbs, 1/2 cup grated Parmesan cheese, garlic powder, oregano, salt, and pepper.
- Dredge the Chicken: Coat each cutlet first in the flour, shaking off the excess. Dip it into the egg mixture, letting excess drip off. Finally, press the cutlet firmly into the Panko mixture, ensuring the entire surface is coated well. Press the breading on to help it adhere.
- Cook the Chicken (Pan-Fried Method for Maximum Crisp): Heat the olive oil in a large skillet over medium-high heat. When the oil shimmers, carefully place two cutlets in the pan. Cook for 3 to 4 minutes per side until golden brown and crisp. Remove and place on a wire rack set over a baking sheet. Repeat with remaining chicken. (If baking, lightly spray the breaded cutlets with cooking spray and bake at 400°F (200°C) for 15 minutes, flipping halfway.)
- Assemble the Parmesan: Preheat your broiler. Spread a thin layer of marinara sauce in the bottom of a 9×13 inch baking dish. Place the crispy chicken cutlets on top of the sauce. Spoon a generous amount of marinara sauce over each cutlet. Top each with slices or a layer of mozzarella cheese, followed by the remaining 1/4 cup of grated Parmesan cheese.
- Broil to Finish: Place the baking dish under the broiler for 2 to 4 minutes. Watch carefully; you want the cheese to be melted, bubbly, and lightly golden brown.
- Serve: Remove from the oven. Garnish with fresh basil. Serve immediately over your favorite pasta or with a side salad.
Notes
- For the crispiest texture when baking, place the breaded cutlets on a wire rack set over a baking sheet before spraying with oil. This allows air circulation underneath.
- Use fresh mozzarella if possible; it melts better and releases less water than pre-shredded varieties.
- If you prefer a baked version without frying, increase the oven temperature to 425°F (220°C) and bake for 18-20 minutes before topping and broiling.
Nutrition
- Serving Size: 1 cutlet
- Calories: 550
- Sugar: 8
- Sodium: 750
- Fat: 28
- Saturated Fat: 12
- Unsaturated Fat: 16
- Trans Fat: 0.5
- Carbohydrates: 35
- Fiber: 3
- Protein: 45
- Cholesterol: 150