

Oh my gosh, are you ready to take a delicious trip back in time? There is just something about a dessert that screams childhood parties and carefree weekends, right? Well, get ready because this **dirt cake** recipe is the one you’ll remember forever. Forget complicated baking—this is the easiest, absolutely show-stopping, no-bake Oreo dirt cake you will ever make. I know what you’re thinking: ‘Can a simple pudding dessert really be that good?’ Trust me, coming from someone who studied the actual science of food, I’ve perfected the ratios here so you get guaranteed results. It’s creamy, it’s crunchy, and it’s guaranteed to be the star of your next gathering!
- Why This Classic No-Bake Oreo Dirt Cake Recipe Works Every Time
- Gathering Your Ingredients for the Perfect Oreo Dirt Cake Recipe
- Step-by-Step Instructions for Your No Bake Dirt Cake
- Making Individual Dirt Cake Cups
- Storage and Making Ahead for Your Quick Make Ahead Dessert
- Frequently Asked Questions About Making Dirt Cake
- Serving Suggestions for This Nostalgic Dessert Recipe
- Nutritional Estimates for Creamy Chocolate Dessert
- Share Your Success with This Dirt Cake Recipe
Why This Classic No-Bake Oreo Dirt Cake Recipe Works Every Time
You need a dessert that’s easy to toss together but tastes like you spent hours fussing over it, right? That’s exactly what this no-bake recipe delivers. When you’re looking for great oreo dirt cake recipe results, it’s all about the layers working in harmony. I’ve designed this specifically so the cream filling doesn’t seep completely into the pudding, keeping that wonderful textural contrast.
- We nail the perfect balance between the rich, sweet cream layer and the dark chocolate pudding, which is key for any great creamy chocolate dessert.
- Because it’s truly no-bake, it sets up beautifully in the fridge, making it the ultimate stress-free party dessert idea.
- The ratio of crushed Oreos to the creamy elements ensures you get that satisfying crunch in every single bite!
Expert Tips for the Best Dirt Cake Texture
Here’s where my food science background really helps! The temperature of your dairy is vital for that silky smooth filling. Make sure that cream cheese and butter are truly softened—not warm or melty, just easily pierced with a finger. Also, don’t over-processor those Oreos! If you crush them too finely, you just get dust. Keep some small, irregular chunks in that crushed oreo dessert for the best mouthfeel.
Gathering Your Ingredients for the Perfect Oreo Dirt Cake Recipe
Okay, assembling this dessert is my favorite part because you probably have most of this stuff lying around already! Seriously, one of the biggest reasons this is my go-to easy dirt cake is that zero fancy shopping is involved. We’re using pantry staples to build layers of joy. I’ve laid out exactly what you need below, but don’t panic if you don’t have an exact match for one item. The real success here comes from how you treat the ingredients!
Ingredient Notes and Simple Substitutions
Let’s talk specifics so your layers set up perfectly. For maximum creaminess—that rich, decadent creamy chocolate dessert vibe—please use full-fat cream cheese. Don’t try to sneak in low-fat; it just won’t give you that sturdy, luxurious layer we need!
When it comes to the whipped topping, the recipe calls for thawed frozen whipped topping because it’s stable and easy. If you’re feeling ambitious and want to use freshly made whipped cream? Go for it! Just make sure you whip it to stiff peaks, and you might want to add just a tiny bit more sugar to the cream cheese mix to compensate for the difference in stability.
Remember, everything needs to be soft when you start mixing the base layers—that’s the key to avoiding lumps!
Step-by-Step Instructions for Your No Bake Dirt Cake
Alright, the prep work is done—now for the fun assembly! Since this is a classic no bake dirt cake, we aren’t messing with ovens, which means we dive right into layering this beauty in your big trifle dish or 9×13 inch pan. Make sure you have your crushed cookies, your dreamy cream mixture, and your slightly thickened chocolate pudding all ready to go. You want to move pretty efficiently once you start layering so everything holds its shape.
Assembling the Layers of Your Layered Pudding Dessert
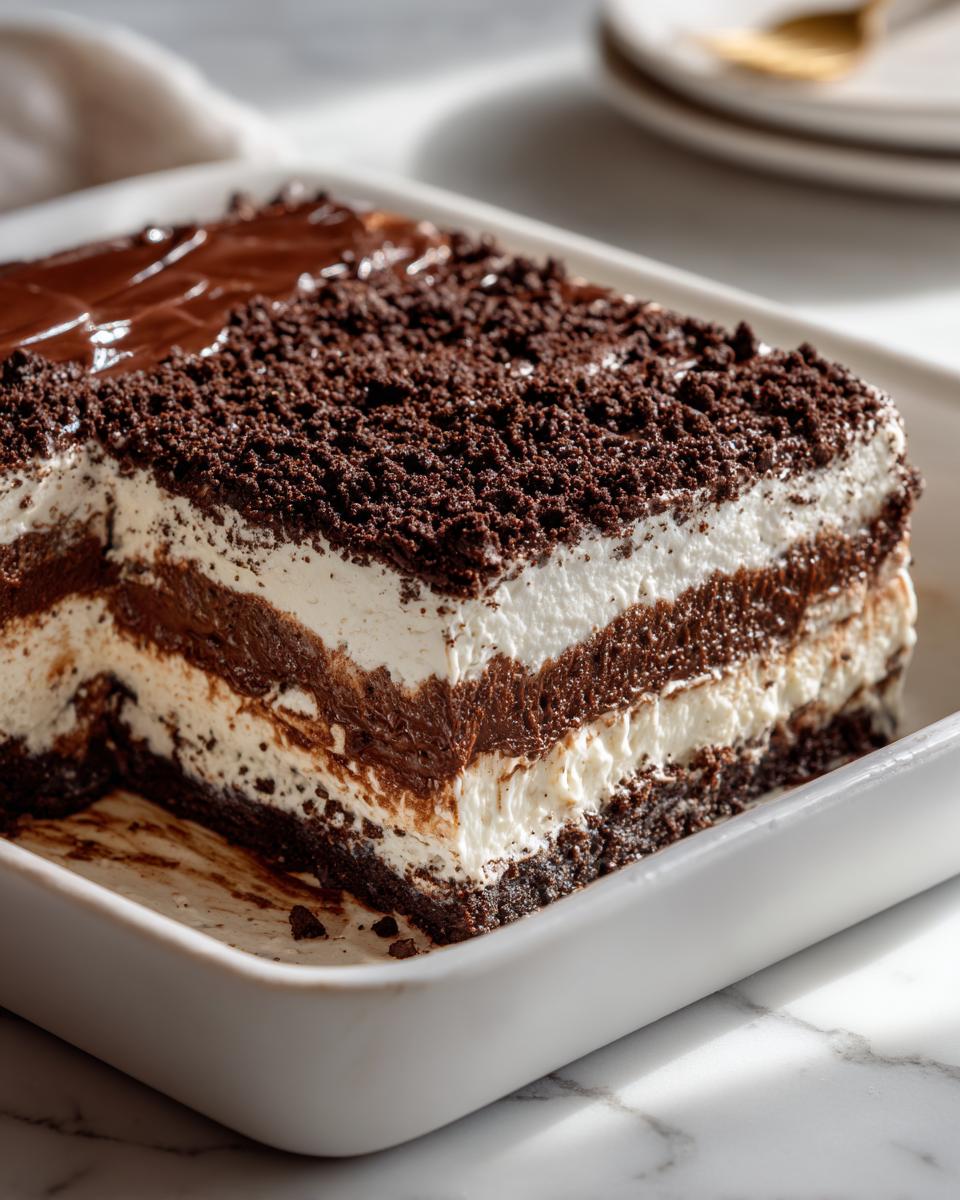
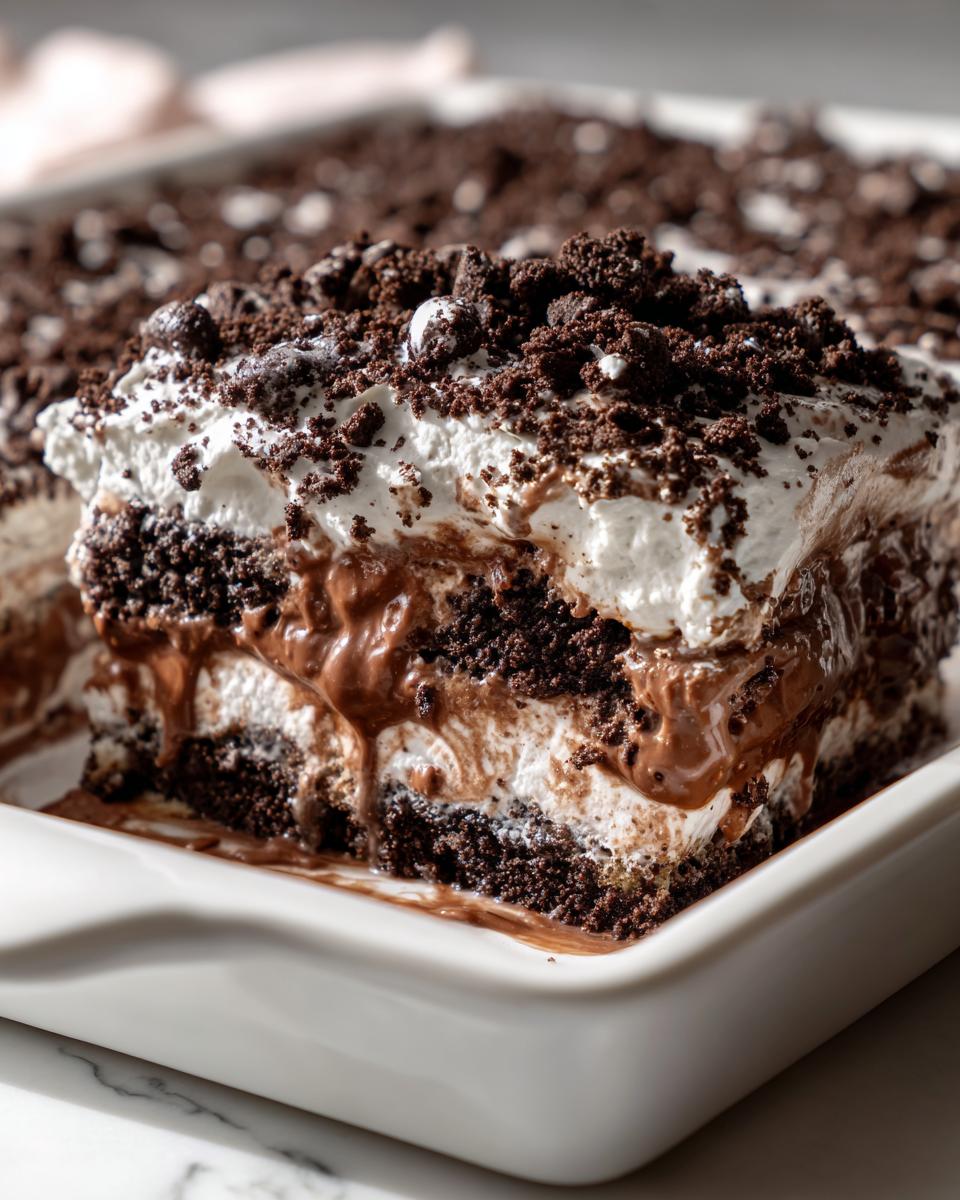
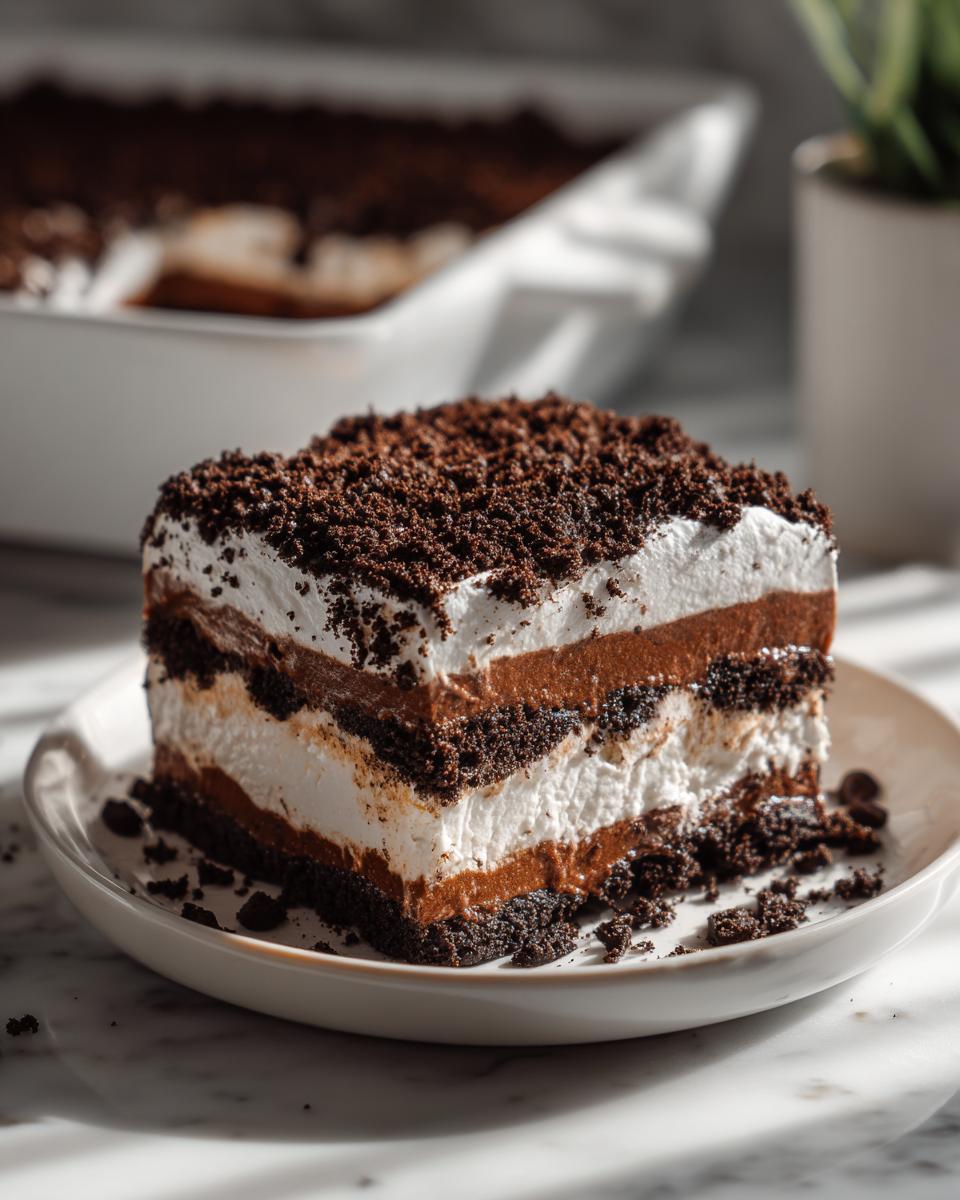
We start from the bottom up, which is essential for structure! First, sprinkle a nice, even layer of those dark Oreo “dirt” crumbs across the base. Don’t be shy; this layer is what holds everything together, and we want that crunch! Next, spread half of your glorious cream cheese mixture gently over those crumbs. Think of it like frosting the bottom layer!
After that, spoon half of your chocolate pudding on top of the cream. Here’s a little trick: if your pudding seems a bit loose, let it sit another five minutes after whisking before you layer it. Soupy pudding means messy layers, and we want crisp lines in our layered pudding dessert. Repeat those steps: Oreos, cream, then the last of the pudding. Finally, use the rest of those crumbs to completely cover the top layer so it looks convincingly like fresh earth.
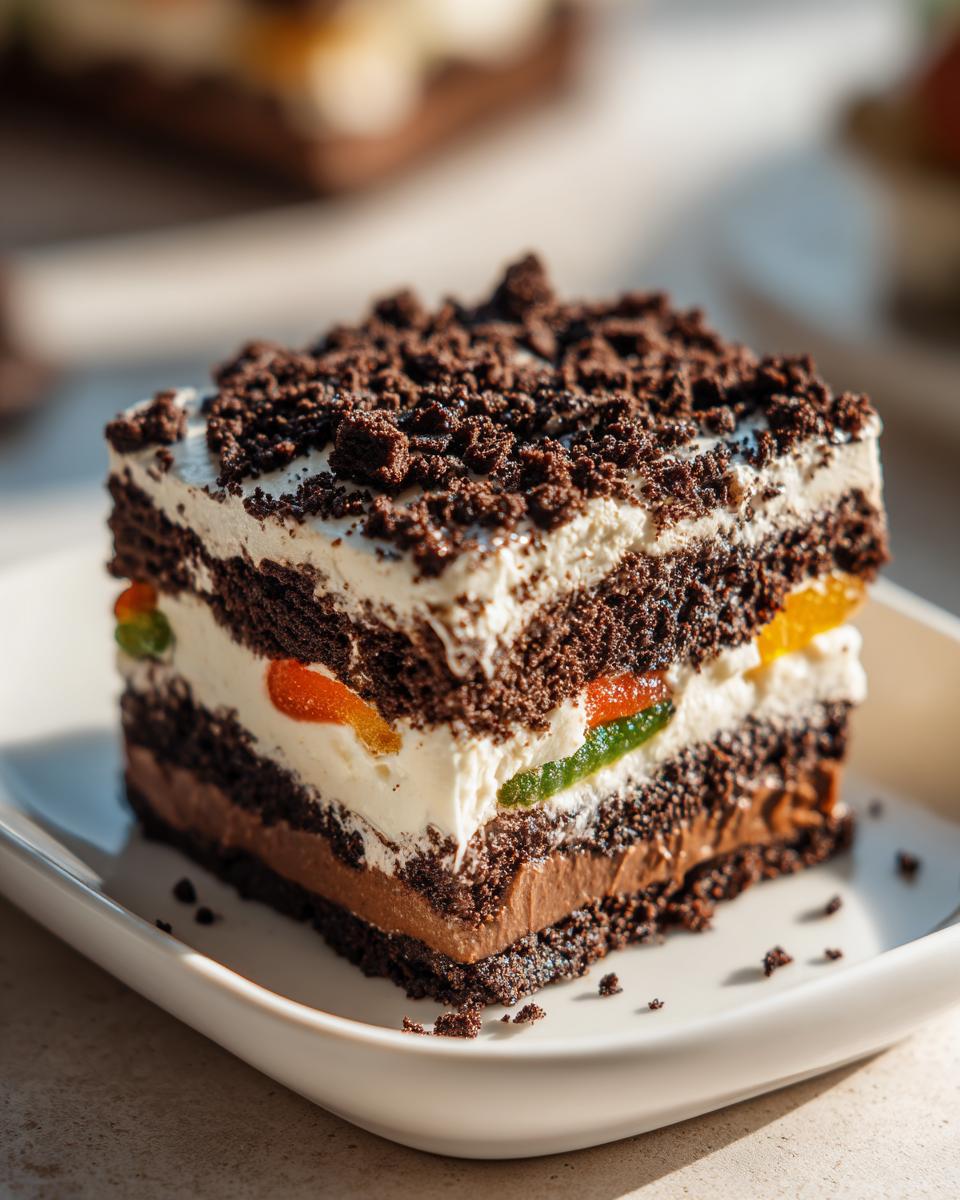
The Final Touch: Decorating Your Dirt Cake with Gummy Worms
This is the part where we lean into the fun! Grab your gummy worms—this is what turns a great dessert into the amazing **dirt cake** everyone remembers. You don’t want to just toss them on top; we want them emerging! Gently press a few worms into that top cookie layer so it looks like they are crawling out of the dirt. Make sure the heads or tails stick out just a bit. It’s so silly, and honestly, it makes this dessert legendary for parties!
Making Individual Dirt Cake Cups
Now, while the big casserole dish is fantastic for family dinners, sometimes you need something super portable, especially for big events or when you’re taking this to a friend’s house. That’s where my love for **dirt cake cups** comes in! It’s the exact same recipe, just downsized. You just swap that big dish for individual clear plastic cups or cute little mason jars.
The layering technique is exactly the same—Oreos, cream, pudding, repeat—but you are going to see those pretty stripes, which makes it look extra fancy! This is such a simple way to pivot this into amazing potluck dessert recipes that people can just grab and go. Plus, the gummy worms look even cuter poking out of a mini-cup!
Storage and Making Ahead for Your Quick Make Ahead Dessert
Because this is a no-bake recipe, it shines as the ultimate quick make ahead dessert! You absolutely must chill it. I know you’ll be tempted to dig in right away, but trust me, patience pays off here. You need a minimum of four hours chilling time so that pudding sets up firm and the cream layer firms up against the cookie crumbs. That’s what gives you that perfect sliceable texture!
If you can manage it, letting this **dirt cake** chill overnight is honestly the best thing you can do. It allows the moisture from the pudding layers to soften the Oreos just slightly, making them soft and fudgy, but not totally soggy. It keeps beautifully in the fridge, covered tightly, for three, maybe even four days. It tastes just as good on day three, making it ideal for party prep!
Frequently Asked Questions About Making Dirt Cake
I know when you find a brand-new favorite **oreo dirt cake recipe**, you end up with a million questions! That’s totally normal. Since I’ve spent years developing foolproof recipes, I’ve rounded up the most common things people ask me when they are making this dessert for the first time. Hopefully, this covers everything you need to know to get that perfect texture!
Can I use homemade chocolate pudding instead of instant for my dirt cake?
Oh, I love that you’re thinking about maximizing flavor! Yes, you absolutely can use homemade chocolate custard instead of the instant pudding mix, and it will certainly give you a richer taste. However, here’s the science part: homemade pudding needs time to set up firm—usually several hours in the fridge—before you layer it. Instant pudding gets thick enough in five minutes, which is why it’s my go-to for this **easy dirt cake** because we want swift assembly! If you use homemade, you might need to pause your building process entirely until the custard is very firm, otherwise, it will just dissolve into your cream layer.
How far in advance can I prepare this easy dirt cake?
This is one of my favorite qualities of this dessert—it’s totally designed to be made ahead! You need that minimum chilling time of four hours, but truly, making it the day before is ideal for the best results in this dirt cake. When it chills overnight, the moisture transfers just slightly from the pudding into the crushed Oreos, softening them beautifully so you get that perfect, fudgy crumble that defines a great layered pudding dessert.
I wouldn’t push it much past 24 hours ahead of time, though. While the mixture is stable, the gummy worms tend to get a little sticky or slightly translucent if they sit submerged for too long. For the best presentation, add those wiggle-makers just a few hours before serving!
Serving Suggestions for This Nostalgic Dessert Recipe
Because this **dirt cake** is so rich and deeply chocolatey, it really shines next to something light and bright! When I serve this up as part of my spread of nostalgic dessert recipes, I always make sure I have fresh coffee ready. The slight bitterness of a dark roast is just heavenly against all that sweet pudding and cream.
If you are serving it warm-weather style, a side of fresh raspberries or thinly sliced strawberries cuts through the richness perfectly. Honestly though, it’s perfectly happy being the only star on the roster—we usually just need forks and maybe a napkin!
Nutritional Estimates for Creamy Chocolate Dessert
Now, I know we aren’t making this **dirt cake** because we are counting every single calorie, but I always like to give you an idea of what’s in the final product, just so you know what you’re dealing with! Because this recipe uses wholesome ingredients like cream cheese and butter, it definitely lands on the decadent side—which is exactly how a good dessert should be, right?
Keep in mind, everything I’m listing here is just an *estimate* based on standard ingredient calculations for one serving size according to the recipe yield. If you use different types of Oreos or swap out the sugar, these numbers will change! But for a single serving of this ultra-creamy creamy chocolate dessert, here is the ballpark breakdown:
- Serving Size: 1 serving
- Calories: Approximately 450
- Fat: About 28g (with 15g of that being saturated fat—hello, butter!)
- Carbohydrates: Around 48g
- Sugar: Roughly 45g (all that good stuff!)
- Protein: About 6g
- Cholesterol: Around 45mg
It’s a rich treat, but totally worth it when you see everyone’s faces when you bring out this fun **no bake dirt cake**!
Share Your Success with This Dirt Cake Recipe
I truly hope you had as much fun whipping up this **dirt cake** as I did perfecting it for you! When you try this recipe, please swing back here and let me know what you thought. Did the gummy worms look realistic? Did you use a trifle dish or simple dirt cake cups?
Dropping a star rating or leaving a quick comment helps build this little community, and I absolutely love hearing your success stories! If you shared a picture on social media, tag me—I’d love to see your creation. Or, if you ended up trying out a wild variation, send me the link, like maybe checking out this fun idea over at Maria’s recipes!
PrintClassic No-Bake Oreo Dirt Cake with Gummy Worms

Welcome! This easy no-bake Oreo dirt cake recipe layers rich chocolate pudding, a creamy filling, and crushed Oreos for a fun, nostalgic dessert. It is perfect for parties or family nights and always impresses guests.
- Prep Time: 25 min
- Cook Time: 0 min
- Total Time: 25 min
- Yield: 12 servings 1x
- Category: Dessert
- Method: No-Bake
- Cuisine: American
- Diet: Vegetarian
Ingredients
- 1 package (8 ounces) cream cheese, softened
- 1 cup unsalted butter, softened
- 1 cup confectioners’ sugar
- 1 container (8 ounces) frozen whipped topping, thawed (or 2 cups homemade whipped cream)
- 2 packages (3.9 ounces each) instant chocolate pudding mix
- 3 cups cold milk
- 1 package (14.3 ounces) Oreo cookies, crushed (about 30 cookies)
- Gummy worms, for decoration
Instructions
- In a large bowl, beat the softened cream cheese, softened butter, and confectioners’ sugar together until the mixture is smooth and creamy.
- Gently fold in the thawed whipped topping until just combined. Set this creamy layer aside.
- In a separate medium bowl, whisk together the instant chocolate pudding mix and cold milk for about two minutes, or until the pudding begins to thicken. Let it stand for five minutes to set further.
- Crush the Oreo cookies into fine crumbs, resembling dirt. You can do this in a food processor or by placing them in a sealed bag and crushing them with a rolling pin.
- Begin layering the dirt cake in a large trifle dish or a 9×13 inch baking dish. Start with a layer of crushed Oreos on the bottom.
- Spread half of the cream cheese mixture evenly over the Oreo layer.
- Spoon half of the thickened chocolate pudding over the cream cheese layer.
- Repeat the layers: add another layer of crushed Oreos, the remaining cream cheese mixture, and finally, the remaining chocolate pudding.
- Top the entire dessert with the final layer of crushed Oreos to resemble dirt.
- Press gummy worms lightly into the top layer so they look like they are emerging from the dirt.
- Cover the dish and chill the Oreo dirt cake in the refrigerator for at least four hours, or preferably overnight, to allow the layers to set completely.
Notes
- For the best ‘dirt’ texture, crush the Oreos finely, leaving a few slightly larger pieces for visual interest.
- If you are making individual servings, layer the ingredients in small clear cups for fun ‘dirt cake cups’.
- You can substitute the instant pudding with homemade chocolate custard for a richer flavor, but ensure it is fully chilled before layering.
Nutrition
- Serving Size: 1 serving
- Calories: 450
- Sugar: 45
- Sodium: 350
- Fat: 28
- Saturated Fat: 15
- Unsaturated Fat: 13
- Trans Fat: 0.5
- Carbohydrates: 48
- Fiber: 2
- Protein: 6
- Cholesterol: 45