
Hello and welcome! I’m Katherine “Katie” Hayes, and I’m so thrilled you found your way to Frosted Fancies. We believe that making truly incredible food at home—even things that seem impossibly complex, like bakery-quality bread—should never feel like a chore. If you’ve dreamed of pulling a stunning, crusty loaf of **artisan bread** from your own oven without breaking a sweat kneading dough, then you are absolutely in the right place today.
That’s why I am sharing our **Dutch Oven No-Knead Artisan Bread**. Thanks to my background in food science and years spent as a professional recipe developer, I’ve fine-tuned this method to guarantee success. You get that beautiful, shatteringly crisp exterior and soft, airy interior with just four simple ingredients and about ten minutes of hands-on time. Seriously, this recipe is pure magic, and it’s the key to achieving that rustic loaf every single time!
- Why You Will Bake This Easy Artisan Bread Recipe Again and Again
- Essential Ingredients for Perfect Artisan Bread
- Equipment Needed for Your Dutch Oven Bread
- Step-by-Step Instructions for No Knead Artisan Bread
- Tips for Achieving Bakery Style Bread at Home
- Savory Flavored Artisan Bread Variations
- Storage and Reheating Instructions for Crusty Homemade Bread
- Frequently Asked Questions About This Artisan Loaf Tutorial
- Estimated Nutritional Data for Simple Yeast Bread
- Share Your Rustic Loaf Recipe Success
Why You Will Bake This Easy Artisan Bread Recipe Again and Again
I just know this recipe is going to become a staple in your house, too! It’s the perfect pick for anyone dipping their toes into baking for the first time because it requires zero physical effort.
- It’s inherently **no-knead**. You mix, you wait, and you bake!
- The Dutch oven method guarantees that crisp, beautiful, **crusty exterior** we all crave.
- It uses just four pantry-stable, **simple ingredients**.
This makes it the ideal entry point for **beginner bread baking** success. If you’re looking for a way to bump up the flavor next time, check out my Parmesan and Garlic loaf idea right here!
Essential Ingredients for Perfect Artisan Bread
The beauty of this simple yeast bread is that you truly only need four things from your pantry to get that amazing artisan loaf. No fancy bread flour needed here—just the basics, used correctly!
Ingredient Specifications and Clarity
When you gather your components, precision matters, even when the recipe is this simple. We rely on instant yeast because it’s the most reliable for a long, slow rise. Make sure your water is cool, not warm, which helps control that long fermentation period that develops all the gorgeous flavor.
- 3 cups All-Purpose Flour
- 1 1/2 teaspoons Salt
- 1/4 teaspoon Instant Yeast
- 1 1/2 cups Cool Water
If you plan on making a savory flavored artisan bread, like the Parmesan mix I mentioned earlier, save those additions for the shaping step. Keep these four ingredients pure for this first, foundational loaf!
Equipment Needed for Your Dutch Oven Bread
Okay, so this recipe nails the ‘no-knead’ part, but you absolutely need the right gear to get that magnificent crust. Forget baking sheets for this one; we are leaning hard into the power of the Dutch oven. Seriously, if you don’t have one, go find one! It’s the secret weapon for any home baker striving for bakery style bread!
The high-walled, heavy cast iron pot traps the steam that naturally releases from the dough during the first half of the bake. That moisture keeps the outside of the loaf soft just long enough for the dough to expand fully—we call this oven spring—and then once you take the lid off, BAM! Instant, thick, crunchy crust.
Here’s the short list of what you absolutely need on hand before you start mixing the dough:
- A heavy, oven-safe Dutch oven with a tight-fitting lid (4 to 6 quart is usually perfect for this recipe).
- Long, sturdy oven mitts or pot holders—you’ll be handling something scorching hot!
- A large mixing bowl—no need for a stand mixer here; your spoon will do all the work!
- Parchment paper. This is non-negotiable! It lets you lift the dangly, sticky dough right into that screaming hot pot without burning yourself or making a mess. If you want more Dutch Oven tips, I wrote a whole piece about it right here!
Once you have these tools ready, the rest is just waiting. Trust me, having your Dutch oven preheating inside the oven is the most crucial part of this entire artisan loaf tutorial!
Step-by-Step Instructions for No Knead Artisan Bread
This is where the magic happens, and I promise you, it’s all about timing and barely touching the dough! Because we skip all that messy kneading, we rely on time to do the heavy lifting. Follow these steps closely, especially regarding the timing, and you’ll have that gorgeous **crusty homemade bread** every time. If you want to see some incredible crust development in action, check out the tips they share over at Delish Symphony on achieving that perfect texture here!
Mixing and the Long Fermentation Rest
First things first: grab your biggest bowl! Whisk together the flour, salt, and yeast—make sure that yeast is instant so it gets right to work. Then, pour in all your cool water. Mix it up with a wooden spoon until it just comes together. Remember, this is a **No Knead Bread Recipe**, so stop mixing as soon as you have no dry flour spots left. The dough should look shaggy and sticky; it’s supposed to look a little messy! Cover that bowl tightly with plastic wrap and leave it completely alone on your counter for 12 to 18 hours. Yes, that long! This slow fermentation builds incredible flavor.
Shaping and Preheating for Crusty Exterior Bread
When that long rest is over, flour your counter lightly. Gently scrape the sticky dough out—don’t punch it down! Just fold it over on itself a few times to create a rough ball. This gentle handling is important for keeping those interior air bubbles intact. Place that dough ball onto a sheet of parchment paper, cover it loosely, and let it sit for just 30 minutes to proof. Now, this is a **Perfect Bread Crust Secret**: crank your oven up to 450°F (232°C) and toss your empty Dutch oven, lid and all, inside to preheat for at least 20 minutes while the dough finishes proofing.
Baking: Trapping Steam for the Perfect Artisan Loaf Tutorial
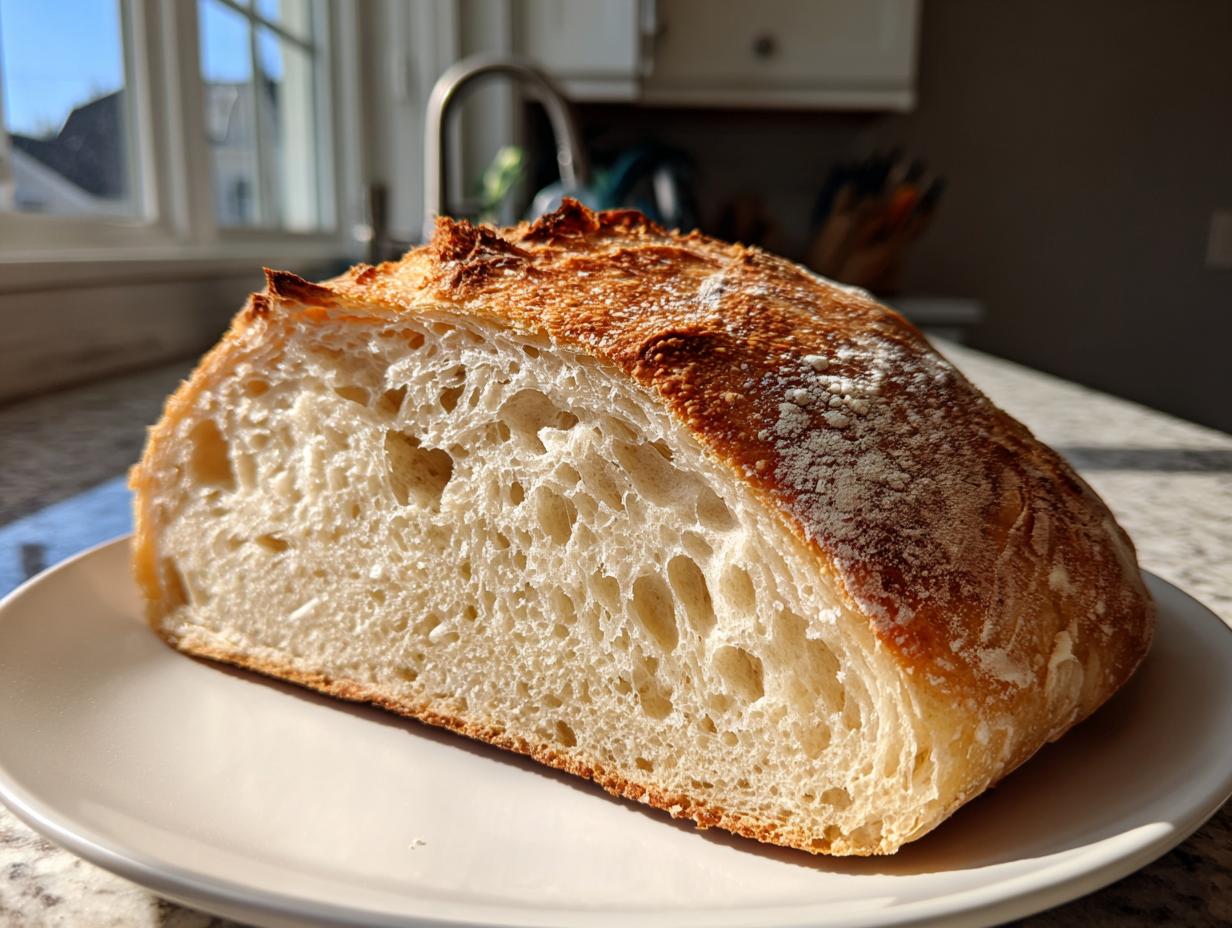
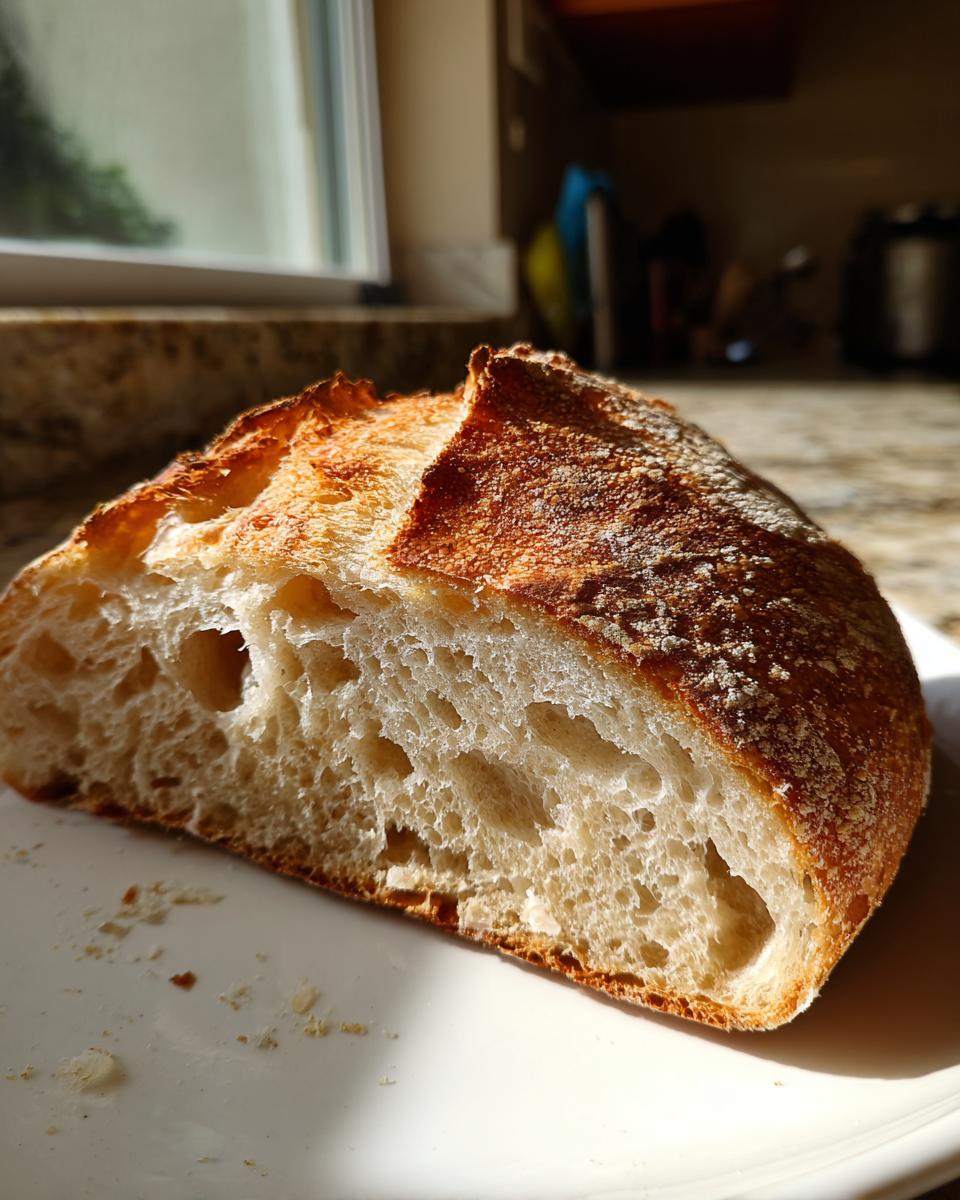
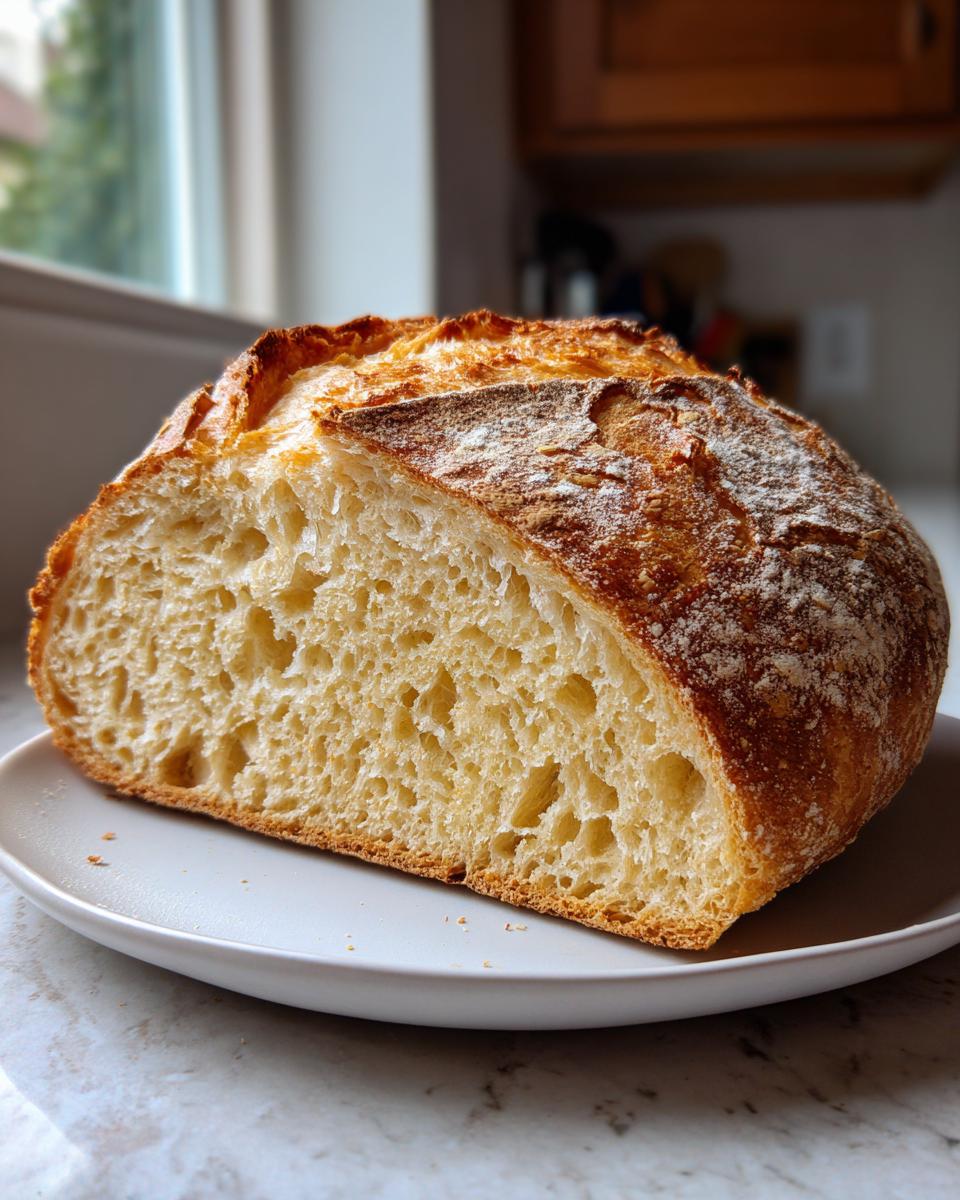
Carefully pull that scorching hot Dutch oven out. Use the parchment paper like a sling to gently lower your raw dough right into the pot. Put the lid back on immediately and pop it back in the oven for 30 minutes. That trapped steam is what gives you that massive oven spring and develops the ideal crust texture! After 30 minutes, take the lid off, and let it bake for another 15 to 20 minutes until it’s deep golden brown. For flavor inspiration using your pot, look at this great recipe by Grid Recipes here! Finally, pull the loaf out and let it cool completely on a wire rack. Resist cutting into it immediately—cooling solidifies the airy crumb structure inside!
Tips for Achieving Bakery Style Bread at Home
Even with this recipe being incredibly simple, baking can sometimes throw little curveballs your way! Since I spent years in professional test kitchens, I want to share a couple of insider pointers that will take your loaf from ‘good’ to ‘absolutely show-stopping bakery style bread at home.’
The biggest mistake people make with this no-knead method isn’t in the mixing; it’s in the preheating or the cooling. If your crust isn’t getting that deep golden color you saw in the pictures, nine times out of ten, it’s because your Dutch oven wasn’t screaming hot when the dough went in. Remember, that initial blast of heat against the cast iron is what makes the dough puff up fast and seals in that initial moisture!

My absolute top tip stems directly from the baking process: the steam!
The lid coming off halfway through is vital. If you leave it on too long, the crust stays pale and soft—we want shatteringly crisp, right? If you take it off too soon, the loaf might deflate a little because the structure hasn’t set. Stick to that 30 minutes covered, then uncovered for 15-20 minutes, and you’re golden. If you’re finding your loaves look a little pale after the time is up, don’t be afraid to use the broiler for the last minute—but watch it like a hawk! Seriously, move away from the oven only if you trust yourself completely; broilers can burn bread in seconds!
Also, and this is tough, let it cool. I know, I know, the aroma is intoxicating, but slicing into this **crusty homemade bread** while it’s still hot rips apart that beautiful, airy crumb structure we worked hard to develop during that long fermentation. It needs at least an hour on the rack. This waiting game is the hardest part of **weekend baking projects**, but it’s worth it!
For more insights into making the most of your baking tools, take a look at some fantastic tips from my friends at Cafe Delites here. Mastering the heat transfer is really the core of artisanal baking!
Savory Flavored Artisan Bread Variations
Once you master the basic four-ingredient recipe—trust me, you will, because it’s so easy—it’s time to start playing around! This particular dough base is just begging for some additions to turn it into a full-blown, restaurant-quality bread basket centerpiece. Who doesn’t love savory flavored artisan bread?
My favorite way to jazz this up is incorporating salty, sharp cheese. Following the notes above, when you handle the dough for that final 30-minute rest (that final proofing stage), work gently but quickly.
The Parmesan and Herb Fold-In
For that gorgeous, complex flavor reminiscent of great Italian artisan baking, you’ll want to fold in about half a cup of finely grated Parmesan cheese along with a teaspoon of dried Italian herbs—I love a mix of oregano and basil, but rosemary is fantastic too. Flour your surface, scrape the dough out, and when you fold it over on itself a few times, gently press the cheese and herbs into the surface before you tuck the edges under to form your rough ball.
Don’t try to knead them in completely! Remember, we don’t want to deflate all the gas we spent 18 hours creating. We just want pockets of flavor distributed nicely. The parchment paper sling still works perfectly when moving this flavored loaf into the hot Dutch oven, so no changes to the baking process needed!
Adding Crunch and Texture with Seeds or Fruit
If you’re looking for a different twist, maybe try something with texture instead of cheese. For a more rustic approach, you can pivot toward a slightly sweeter but still savory loaf. Try adding about a quarter cup of toasted sunflower or pumpkin seeds right along with your cheese and herbs in that final shaping step.
Alternatively, for something that pairs beautifully with soups or salads—and adds a lovely chew—try soaking a half-cup of golden raisins or dried cranberries in warm water for about 15 minutes, draining them well, and folding them in during shaping. This adds a surprising burst of sweet-tart flavor that plays really well against that super crunchy exterior. See? Baking isn’t just about following steps; it’s about making it your own!
Storage and Reheating Instructions for Crusty Homemade Bread
So you baked the most beautiful, golden loaf of artisan bread imaginable, and now you have leftovers (if you can resist eating it all, that is!). This is where the nature of a **crusty homemade bread** loaf becomes a little tricky. That fantastic, shatteringly crisp crust you worked so hard for? Well, it’s going to soften up as the moisture from the interior migrates outward. That’s just science, honey!
If you plan on eating the whole thing within 24 hours, keep it stored on the counter, but skip the plastic bag! Plastic traps moisture right against the crust, turning that lovely crunch into a chewy disappointment almost instantly. Instead, wrap the loaf loosely in a clean, dry kitchen towel or paper bag. This allows the bread to breathe while protecting it from drying out too much on the cut side.
If you need it to last longer than a day, my professional recommendation is freezing it—but only after it has cooled completely, ideally sliced.
How to Revive That Perfect Crust
Don’t ever throw out slightly soft bread! We can bring that crust back to life, every single time. The trick is reintroducing dry heat quickly, which dries out the surface before the interior gets too warm.
Here’s my foolproof method for reviving any leftover loaf, whether it’s plain or that delicious rosemary sea salt loaf my friends have perfected here:
- Preheat your oven to 350°F (175°C).
- Place the loaf (or even just a large slice) directly onto the oven rack.
- Bake for about 5 to 8 minutes.
That’s it! You’ll hear the crust crackle as it reheats. It’s like magic, but it’s really just controlled thermodynamics! Just make sure you let it cool for about five minutes after this quick blast of heat before you slice into it, or you might burn your fingers trying to get a piece!
Frequently Asked Questions About This Artisan Loaf Tutorial
I love hearing from you all when you try this **artisan bread**! It’s so rewarding seeing everyone achieve that amazing bakery quality at home. Since this no-knead method is slightly different from traditional baking, I get a few questions popping up all the time!
Can I make this artisan bread recipe faster if I don’t have 18 hours?
That’s the eternal question for anyone wanting **quick artisan bread**! The long, slow fermentation (that 12-18 hour rest) is what truly develops the deep, complex flavor and the open, airy crumb structure. If you’re in a rush, you can use warm water (about 105°F) instead of cool water, and reduce that initial rest time to 8 to 10 hours. However, I have to warn you: the resulting flavor won’t be quite as deep as the long-fermented version. If you’re interested in exploring other fast methods, check out what my friends at RecipeTin Eats suggests for yeast bread here!
Is the Dutch Oven absolutely necessary? I don’t own one.
I know, the investment in a Dutch oven can feel big when you’re just starting out! The Dutch oven is vital because it traps steam, which is essential for that signature crackly crust and maximum oven spring. If you’re trying to **make bread without kneading**, the steam element is your second most important tool. If you don’t have one, your best workaround is to use a heavy, oven-safe pot with a lid—like a metal stockpot—and place a small metal baking pan (like a pie tin) on the rack *below* your bread. Once the dough is in the oven, carefully pour about a cup of hot water into that lower pan to create steam, then quickly shut the door. You’ll need to refill the water once or twice during the covered bake time.
What if I only have Active Dry Yeast instead of Instant Yeast?
It happens! Instant yeast is my go-to because it can just be mixed right into the dry ingredients, but Active Dry Yeast works just fine, you just need to “wake it up” first. Before you mix anything, combine the 1/4 teaspoon of yeast with about 1/4 cup of the required cool water and a tiny pinch of sugar (if you have it). Let it sit for 5 to 10 minutes until it gets foamy—that means it’s alive and happy. Then, use the rest of your cool water in the recipe as directed, adding this yeast mixture in with the rest of the liquid during Step 2. It’s a small extra step, but it ensures you get that lovely slow rise!
My dough is way too sticky; is this normal for no-knead bread?
Yes, yes, a thousand times yes! If you are anxious about how sticky this dough is, please check out the basics on this article; their description of the dough texture is spot on for this process. Remember, we aren’t developing gluten through physical kneading, so we rely on the long hydration time (the 18 hours) to do the work. You should absolutely be using parchment paper to transfer this shaggy, sticky mess into the pot. Just flour your outside surface lightly during the quick shaping step, and rely on the parchment paper for all the heavy lifting. It keeps things clean and stops you from overworking the dough!

Estimated Nutritional Data for Simple Yeast Bread
Now, I know my focus here is always on flavor and how joyfully simple these recipes are, but since I have that obsessive food science background, I always want to give you transparency where I can! We have to remember that once you start folding in Parmesan, olive oil, or herbs, these numbers are going to shift dramatically, so always treat this as a baseline for the four-ingredient loaf.
This data is based on a single slice, assuming the entire loaf yields 16 servings. This gives you a great idea of what you’re eating when you enjoy a slice of this **simple yeast bread**!
- Serving Size: 1 slice
- Calories: 180
- Sugar: 0.2g
- Sodium: 380mg (This is slightly high due to the added salt, but remember, salt is crucial for controlling the yeast in a no-knead dough!)
- Fat: 0.5g
- Saturated Fat: 0.1g
- Carbohydrates: 38g
- Protein: 6g
A little disclaimer, because I always want you to trust the recipes here: These are estimates based on standard ingredient databases. If you use a different brand of flour or adjust the salt ever so slightly, the numbers will shift. But overall, for a hearty, crusty homemade bread that required virtually no effort, this is pretty fantastic nutrition-wise!
Share Your Rustic Loaf Recipe Success
Now, you’ve got all the tools, all the timing, and all the secrets to bake the best homemade bread imaginable. But honestly, my favorite part of running Frosted Fancies is hearing when one of you pulls off a masterpiece in your own kitchen! That first slice of artisan loaf that cracks when you cut it? That deserves a photo!
I truly hope this recipe sparks your love for baking. It’s proof that high-quality, rustic loaf recipes don’t need hours of elbow grease. If you followed along with the 10 minutes of prep time and the 50 minutes of cook time, I’d be so grateful if you’d hop down to the rating section below and give this Dutch Oven Bread a star rating! It really helps other cooks know they can trust this recipe.
And please, tag me on social media when you pull that beautiful, golden loaf out of the oven! I want to see your crusts!
I have one last question for you—and this one will inspire my next batch! Which flavor addition are you most excited to try first on your next loaf of artisan bread? Are you sticking with salty cheese, or going for something completely wild? Let me know in the comments below!
PrintDutch Oven No-Knead Artisan Bread: Easy Crusty Homemade Loaf
Welcome! Learn the simple technique to bake bakery-style artisan bread at home using a Dutch oven. This no-knead recipe delivers a perfectly crusty exterior and an airy interior with minimal effort, making it ideal for beginner bread baking.
- Prep Time: 10 min
- Cook Time: 50 min
- Total Time: 19 hours 0 minutes
- Yield: 1 loaf 1x
- Category: Baking
- Method: No-Knead Baking
- Cuisine: American
- Diet: Vegetarian
Ingredients
- 3 cups All-Purpose Flour
- 1 1/2 teaspoons Salt
- 1/4 teaspoon Instant Yeast
- 1 1/2 cups Cool Water
Instructions
- In a large bowl, whisk together the flour, salt, and instant yeast.
- Pour in the cool water and mix with a wooden spoon until just combined. The dough will be shaggy and sticky; do not overmix.
- Cover the bowl tightly with plastic wrap and let the dough rest at room temperature for 12 to 18 hours. This long, slow fermentation develops the flavor.
- After the long rest, lightly flour a work surface. Gently scrape the dough out of the bowl onto the flour. Fold the dough over itself a few times to form a rough ball.
- Place the dough ball on a piece of parchment paper, cover it loosely with plastic wrap or a clean kitchen towel, and let it rest for 30 minutes. This is the final proof.
- About 20 minutes before the final proof ends, place your empty Dutch oven (with the lid on) into your oven. Preheat the oven to 450 degrees Fahrenheit (232 degrees Celsius).
- Carefully remove the hot Dutch oven from the oven using oven mitts. Lift the dough by holding the parchment paper handles and gently lower the dough and parchment paper into the hot pot.
- Cover the Dutch oven with the lid and return it to the oven. Bake for 30 minutes with the lid on. This traps steam, which is key for a perfect crust.
- Remove the lid and continue baking for another 15 to 20 minutes, or until the crust is deep golden brown.
- Carefully remove the bread from the Dutch oven and transfer it to a wire rack to cool completely before slicing. This cooling period is important for the interior texture.
Notes
- For a savory flavored artisan bread, gently fold in 1/2 cup of grated Parmesan cheese and 1 teaspoon of dried Italian herbs during the final shaping step before the 30-minute rest.
- Achieving that shatteringly crisp exterior relies on the high heat and steam provided by the Dutch oven. Do not skip preheating the pot.
- If you prefer a quicker bake, you can use warm water, but reduce the initial rest time to 8 to 10 hours.
Nutrition
- Serving Size: 1 slice
- Calories: 180
- Sugar: 0.2g
- Sodium: 380mg
- Fat: 0.5g
- Saturated Fat: 0.1g
- Unsaturated Fat: 0.4g
- Trans Fat: 0g
- Carbohydrates: 38g
- Fiber: 1.5g
- Protein: 6g
- Cholesterol: 0mg