
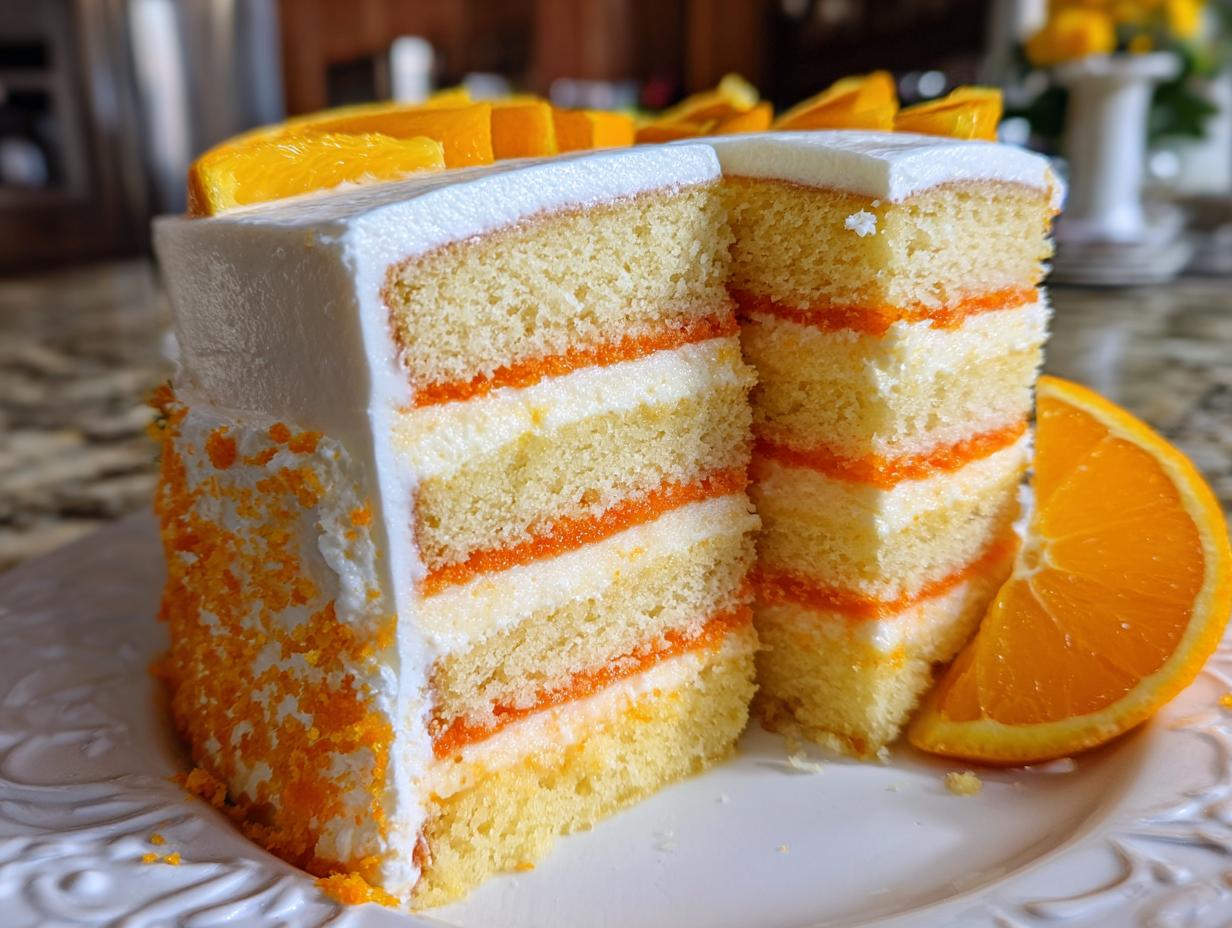
Hello and welcome, sweet friends! I’m Katie, and I am so excited you stopped by Frosted Fancies today. If you’re anything like me, the mention of a Creamsicle Cake sends you right back to happy childhood summers and sticky popsicles. I completely get that feeling!
That’s exactly why I spent so much time perfecting this recipe. Forget those dry, crumbly orange cakes you might have tried before. Because of my background perfecting recipes in professional kitchens, I can promise you this Ultimate Orange Creamsicle Layer Cake is entirely different. It’s reliable, incredibly moist, and truly bakery-quality, proving you don’t need fancy equipment to get professional results at home.
We’re going to capture that perfect, bright citrus and creamy vanilla magic—trust me, this one is worth every second!
- Why This Ultimate Creamsicle Cake Recipe Works Every Time
- Ingredients for Your Moist Orange Layer Cake
- Step-by-Step Instructions for the Perfect Creamsicle Cake
- Tips for Success Making Your Creamsicle Cake
- Variations: Beyond the Classic Creamsicle Cake
- Storing and Serving Your Bright Orange Dessert Ideas
- Frequently Asked Questions About Orange Creamsicle Cake Recipe
- Nutritional Estimate for This Family Favorite Citrus Dessert
- Share Your Homemade Creamsicle Treat Experience
Why This Ultimate Creamsicle Cake Recipe Works Every Time
I know, I know, there are a million recipes out there, but this specific formula just hits different! When developing this for the blog, my goal was that perfect, bright tang without sacrificing any moisture. That’s why I leaned on some food science knowledge here.
First off, we use buttermilk alongside oil. That little bit of acid tenderizes the crumb, which is key for a truly Moist Orange Layer Cake. You won’t get that dry texture you dread!
- We always use fresh orange zest in the batter. That oil in the zest packs way more punch than just fresh juice alone!
- The combination of butter and oil gives us the rich flavor of butter but the guaranteed lasting moisture of oil.
- The final result is a stable, beautiful layer cake that tastes like the most luxurious Creamy Citrus Dessert. You can see one of my test batches over at this link if you want to peek!

Ingredients for Your Moist Orange Layer Cake
Alright, friends, let’s talk about what goes into making this dreamy Creamsicle Cake so perfectly balanced. When you’re aiming for that bakery quality, precision matters, and knowing exactly *what* you’re using really helps!
I’ve broken this down clearly below because we need two different sets of ingredients: the part that bakes into the cake, and the part that turns into that fluffy, tangy topping. Don’t skimp on the fresh components here; they make all the difference in getting that intense citrus flavor we love!
For the Fluffy Orange Cake Layers
- 1 1/2 cups all-purpose flour
- 1 1/2 cups granulated sugar
- 1 tablespoon baking powder
- 1/2 teaspoon salt
- 1/2 cup unsalted butter, softened right to room temperature—this is key!
- 3 large eggs, room temperature is best for smooth mixing
- 1 cup buttermilk (this is your moisture secret weapon)
- 1 teaspoon vanilla extract
- 1/2 cup fresh orange juice (strain out any seeds!)
- 1 tablespoon fresh orange zest (please don’t use the dried stuff!)
- 1/2 cup vegetable oil
For the Creamy Orange Cream Frosting Recipe
This frosting is what really brings the ‘creamsicle’ flavor home. For the absolute smoothest result, make sure your powdered sugar is sifted—seriously, don’t skip that step!
- 1 cup unsalted butter, softened completely
- 4 cups powdered sugar, sifted
- 1/4 cup fresh orange juice
- 1 teaspoon vanilla extract
- 1/4 teaspoon salt
- Orange food coloring (just a drop if you want that brighter, nostalgic color)
Step-by-Step Instructions for the Perfect Creamsicle Cake
Getting this Creamsicle Cake right is all about pacing yourself and paying attention during the mix. If you follow my professional steps here, you’ll see the batter transform beautifully before it even hits the oven. Don’t rush the cooling, either; that’s where cakes get ruined!
Preparing the Cake Batter and Baking
First thing: get that oven preheated to 350°F (175°C) and make sure those two 8-inch pans are greased, floured, and have parchment circles on the bottom—this prevents sticking, guaranteed! In a big bowl, whisk the dry stuff: flour, sugar, baking powder, and salt. Now, add that softened butter and mix it low and slow until it looks like coarse sand. You’re creaming it in place, essentially.
Next, whisk your liquids separately: eggs, buttermilk, vanilla, juice, zest, and oil. Then, add those wet ingredients gradually into your dry/butter mix. Mix on low speed until it just comes together. Listen to me: Do Not Overmix! Overmixing means a tough cake, and we want fluffy layers. Divide the batter evenly, bake for about 28 to 32 minutes, and test with a toothpick. Let them cool for 10 minutes in the pan before turning them out to cool completely on a rack. They need to be ice-cold before frosting!
Crafting the Orange Cream Frosting Recipe
While those lovely orange layers are cooling, we whip up the best part—the Orange Cream Frosting Recipe. Start by beating that softened butter in a stand mixer or with a hand mixer until it’s pale and perfectly creamy. This takes a few minutes, but it builds the base structure.
Now, add that 4 cups of sifted powdered sugar slowly while the mixer is on the lowest speed so you don’t create a sugar cloud in your kitchen! Once it’s all mixed in, crank the speed up to medium-high. Pour in the orange juice, vanilla, and salt. Beat that beauty for a solid three minutes until it’s unbelievably light and fluffy. If you’re looking for that bright, nostalgic color, add just one tiny drop of orange food coloring now.
Assembling Your Creamsicle Cake
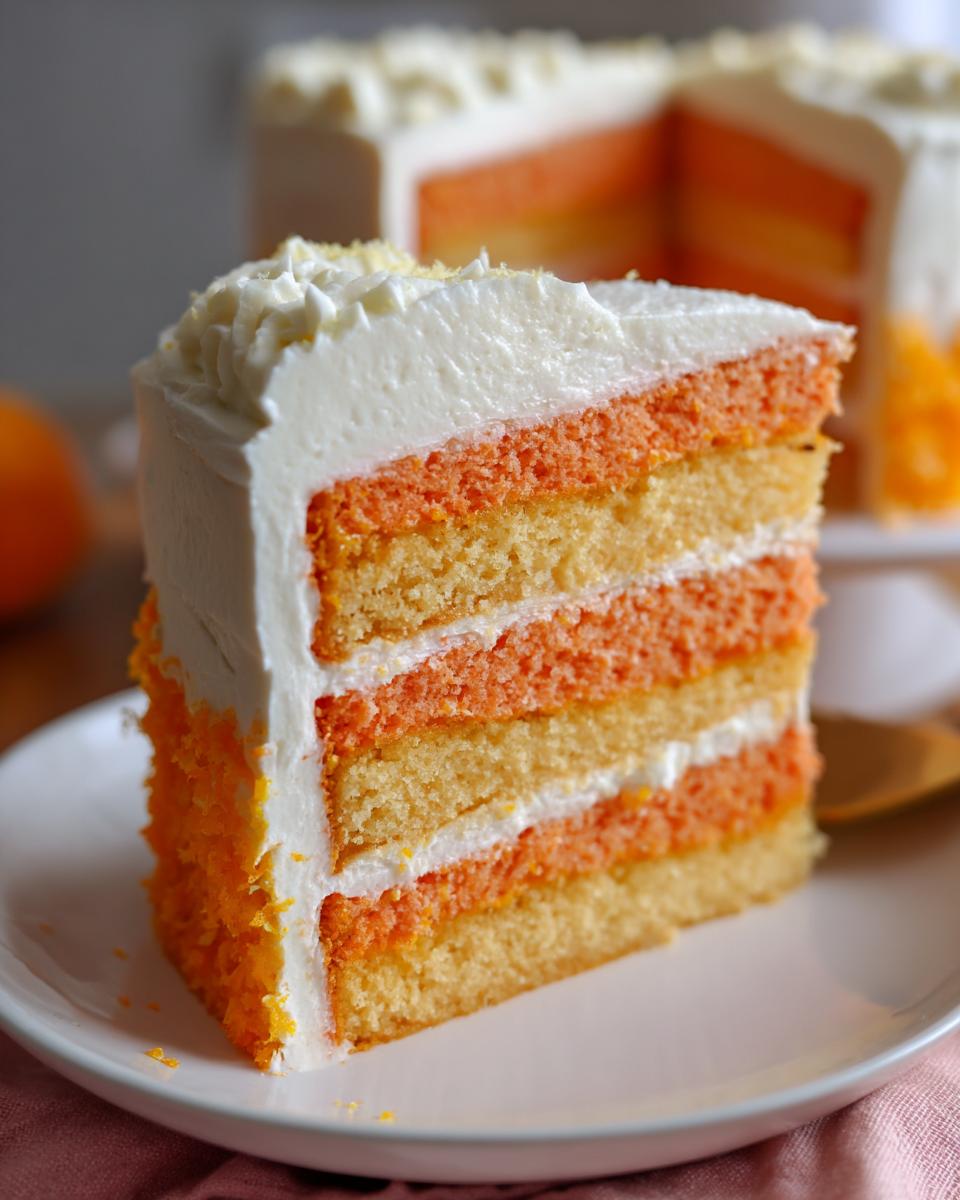
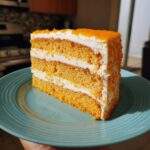
Once those cake layers are totally cool—I mean, completely cool, or the frosting melts everywhere—it’s time to build! Pop your first layer on your stand or plate. Scoop about one-third of that gorgeous icing right on top and spread it edge to edge. Then, gently place your second layer on top. Cover the top and the sides with the rest of the frosting. My final trick for picture-perfect slices is to pop the whole finished Creamsicle Cake into the fridge for about 15 minutes. It firms up the frosting just enough so you get those clean, beautiful cuts when you serve it. Check out this great tutorial if you want extra visual guidance!
Tips for Success Making Your Creamsicle Cake
Now that you have the recipe, let me give you my top three pro tips for turning this from a good cake into the Best Orange Cake Recipe you’ll ever make. Remember, baking is science, and science loves consistency!
First, temperature is your best friend, especially for the cake layers. Your butter needs to be softened, but your eggs and buttermilk should be at room temperature. This allows them to emulsify properly with the fats instead of seizing up. If you forget to pull them out, you can put the eggs in a bowl of warm (not hot!) water for five minutes.
To really punch up that citrus, try adding a tablespoon of orange simple syrup soak after the cakes have cooled slightly but before you frost them. That extra touch of liquid goodness ensures you have the most wonderfully moist result. It’s my favorite little trick for taking any cake to the next level!
Variations: Beyond the Classic Creamsicle Cake
While this layered cake is my absolute favorite, I know sometimes you need something quicker, or maybe you want to mix things up for an upcoming potluck. This flavor profile is so perfect as an Orange Dreamsicle Dessert, so we have a few easy ways to switch it up!
The simplest change is turning it into a glorious poke cake. I included a note about it, but seriously, bake the batter in a 9×13 pan, poke holes all over while it’s still warm, and pour a simple glaze made of powdered sugar and orange juice over the top. It’s incredibly popular and much faster!
If you’re looking for truly easy treats, I’ve toyed around with semi-no-bake versions involving pudding and whipped topping—great for quick No Bake Creamsicle Dessert Ideas when the weather heats up. But for baking, stick to this layer cake formula; it delivers the best texture, hands down. You can check out the poke cake version here if you want the quick path!
Storing and Serving Your Bright Orange Dessert Ideas
Because this Creamsicle Cake is slathered in that lovely, creamy frosting—which uses real butter and juice—it needs to live in the fridge if you aren’t serving it right away. Pop it under a cake dome or cover it loosely with plastic wrap, making sure the wrap doesn’t stick to the frosting.
I usually pull it out about 30 minutes before serving so the cake layers can soften up a touch. It’s fantastic served cold, too! For serving suggestions, keep it simple: fresh raspberries or even a dollop of plain, unsweetened whipped cream balances the sweet citrus perfectly. If you’re looking for party inspiration, you can see a great glazed version over at this external link!
Frequently Asked Questions About Orange Creamsicle Cake Recipe
Can I use bottled orange juice instead of fresh juice?
That’s a common question when you’re aiming for an Easy Creamsicle Cake! You certainly *can* use bottled, pasteurized juice, but my honest opinion? Don’t. Bottled juice is often more cooked down and lacks that bright, zesty pop that fresh juice and zest provide. If you absolutely must use bottled, make sure it’s 100% pure juice, not from concentrate, and maybe add an extra half teaspoon of zest to compensate for the duller flavor.
How do I get that intense, bright orange color?
If you want that perfect, sunset orange color that screams ‘Creamsicle!’ you usually need a little help. The fresh juice only gives a pale yellow tint. I recommend using a high-quality gel food coloring—just a drop or two—added right into your Orange Cream Frosting Recipe while you’re whipping it on high speed. Gel colors are much more vibrant than liquid drops, and they won’t thin out your beautiful frosting!
My cake layers ended up a little crumbly. What went wrong?
Oh, I hate when that happens! Crumbly texture in a Moist Orange Layer Cake almost always points to two things: either the cake layers weren’t fully cooled before you tried to frost them, or you added the wet ingredients to the dry mixture too quickly, causing you to overmix the final batter. Remember what I said about mixing only until *just combined*? Overmixing develops the gluten, making it tough and crumbly rather than tender. For a better outcome next time, check out the tips here, too!
Can I make this ahead of time?
Yes! This is one of the best Easy Cakes for Parties because you can totally prep it in advance. Bake your layers one day, wrap them tightly in plastic wrap once cooled, and leave them at room temperature or frozen. Make the frosting the day you plan to serve it. Assembled, the cake is great for two days covered tightly in the fridge!
Nutritional Estimate for This Family Favorite Citrus Dessert
Okay, now that we’ve talked about making this beautiful Creamsicle Cake perfect, let’s chat quickly about the numbers. I always include this section because I know some of you track things, but I need you to know this is just an estimate based on my calculations. Baking is an art, but the nutrition facts are science, right?
Since this delicious cake uses butter, sugar, and oil, it’s definitely a treat meant for celebrations! When you slice it up for that party, here’s what the recipe breakdown looks like, based on the 10 servings we aimed for in the recipe notes:
- Serving Size: 1 slice
- Calories: 450
- Sugar: 55g
- Sodium: 250mg
- Fat: 22g
- Saturated Fat: 12g
- Unsaturated Fat: 10g
- Trans Fat: 0g
- Carbohydrates: 60g
- Fiber: 1g
- Protein: 4g
- Cholesterol: 75mg
Just remember, these are just estimates! If you use less oil or swap out the butter for a lower-fat option in the frosting, those numbers will shift. Use this as a helpful guide, but enjoy every bite of your homemade Family Favorite Citrus Dessert!
Share Your Homemade Creamsicle Treat Experience
That’s it, my friends! You’ve got the blueprint for what I firmly believe is the best, most reliable Creamsicle Cake out there. It’s a showstopper, but honestly, it’s just so delightful to bake.
Now our job is to celebrate! I genuinely want to see your creations. Did you decide to stick with the simple layers, or did you get adventurous with a poke cake variation? Did you use that vibrant orange food coloring, or did you keep it naturally pale and creamy?
When you bake this up—maybe for your next barbecue or family gathering. It’s truly the ultimate Easy Cake for Parties—please snap a picture and tag me on social media! I love seeing my recipes come to life in your kitchens. And if you have a moment, dropping a quick star rating right here on the blog helps other folks feel confident about trying this Nostalgic Orange Vanilla Cake, too!
If you want to see someone else’s dreamy take on this flavor profile, you might enjoy the inspiration you can find right here, and for more tips on making your cake extra special before you frost it, check out what they did over at this link!
Happy baking to you all, and when you take that first bite of citrusy perfection, tell everyone Katie from Frosted Fancies sent you!
PrintUltimate Orange Creamsicle Layer Cake
Create a moist, bakery-quality layer cake that captures the nostalgic flavor of an orange creamsicle. This recipe balances a light vanilla sponge with tangy orange zest and a creamy vanilla buttercream frosting.
- Prep Time: 25 min
- Cook Time: 30 min
- Total Time: 55 min
- Yield: 10 servings 1x
- Category: Dessert
- Method: Baking
- Cuisine: American
- Diet: Vegetarian
Ingredients
- 1 1/2 cups all-purpose flour
- 1 1/2 cups granulated sugar
- 1 tablespoon baking powder
- 1/2 teaspoon salt
- 1/2 cup unsalted butter, softened
- 3 large eggs
- 1 cup buttermilk
- 1 teaspoon vanilla extract
- 1/2 cup fresh orange juice
- 1 tablespoon orange zest
- 1/2 cup vegetable oil
- For the Frosting: 1 cup unsalted butter, softened
- 4 cups powdered sugar, sifted
- 1/4 cup fresh orange juice
- 1 teaspoon vanilla extract
- 1/4 teaspoon salt
- Orange food coloring (optional)
Instructions
- Preheat your oven to 350°F (175°C). Grease and flour two 8-inch round cake pans. Line the bottoms with parchment paper.
- In a large bowl, whisk together the flour, sugar, baking powder, and salt.
- Add the softened butter to the dry ingredients and mix on low speed until the mixture resembles coarse crumbs.
- In a separate bowl, whisk together the eggs, buttermilk, vanilla extract, orange juice, orange zest, and vegetable oil until combined.
- Gradually add the wet ingredients to the dry ingredients, mixing on low speed until just combined. Do not overmix.
- Divide the batter evenly between the prepared cake pans.
- Bake for 28 to 32 minutes, or until a toothpick inserted into the center comes out clean.
- Let the cakes cool in the pans for 10 minutes before inverting them onto a wire rack to cool completely.
- To make the frosting, beat the softened butter in a large bowl until creamy.
- Gradually add the sifted powdered sugar, mixing slowly until incorporated.
- Add the orange juice, vanilla extract, and salt. Beat on medium-high speed until the frosting is light and fluffy, about 3 minutes. Add a drop of orange food coloring if you want a brighter orange hue.
- Once the cakes are completely cool, place one layer on a serving plate. Spread about one-third of the frosting evenly over the top.
- Place the second cake layer on top. Frost the top and sides of the entire cake with the remaining frosting.
- Chill the cake for 15 minutes before slicing for cleaner cuts.
Notes
- For extra orange flavor, you can soak the cooled cake layers with a simple syrup made from equal parts sugar and orange juice before frosting.
- Use fresh orange zest for the best bright citrus flavor in the cake batter.
- If you prefer a poke cake style, use one 9×13 inch pan and poke holes after baking before pouring a simple orange glaze over the warm cake.
Nutrition
- Serving Size: 1 slice
- Calories: 450
- Sugar: 55g
- Sodium: 250mg
- Fat: 22g
- Saturated Fat: 12g
- Unsaturated Fat: 10g
- Trans Fat: 0g
- Carbohydrates: 60g
- Fiber: 1g
- Protein: 4g
- Cholesterol: 75mg