
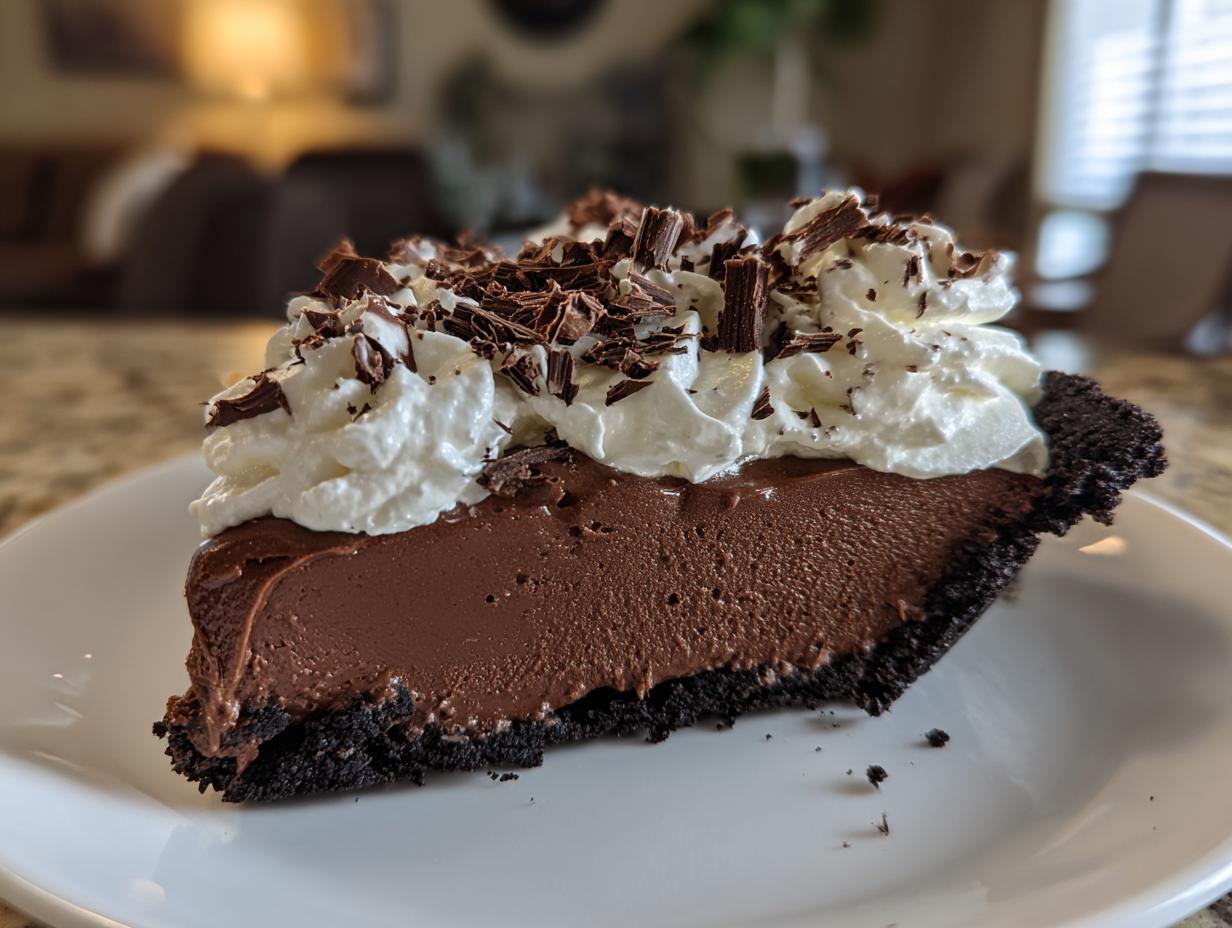
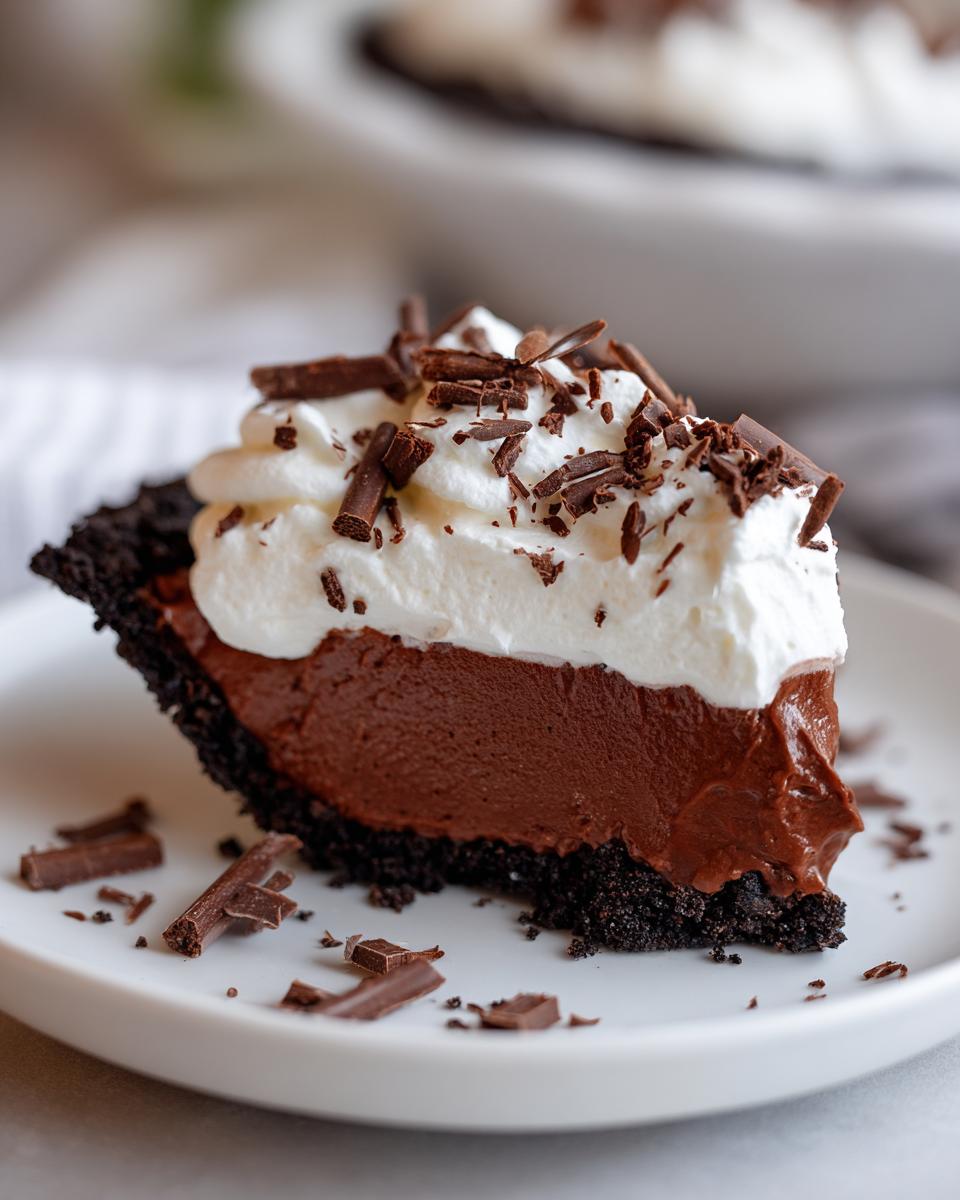
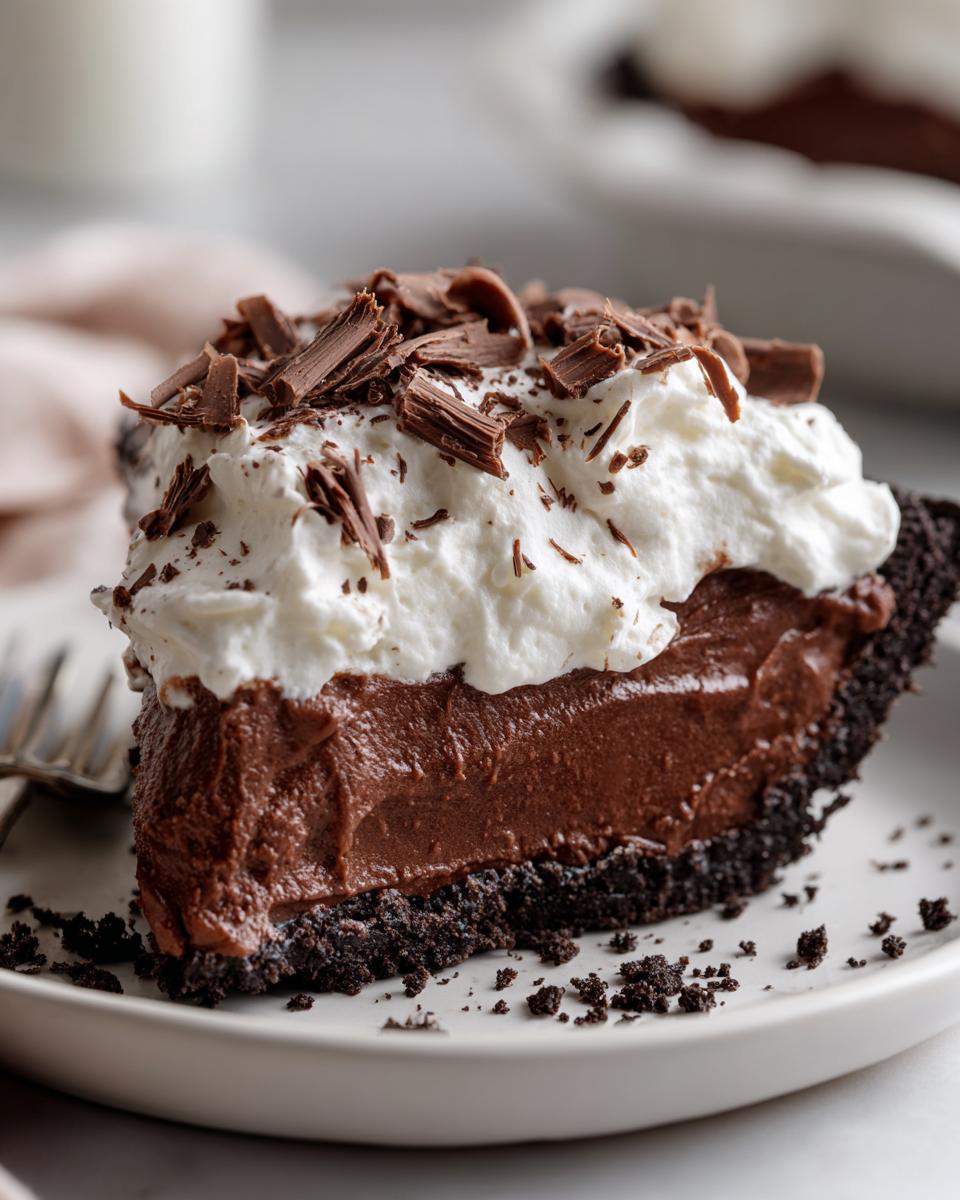
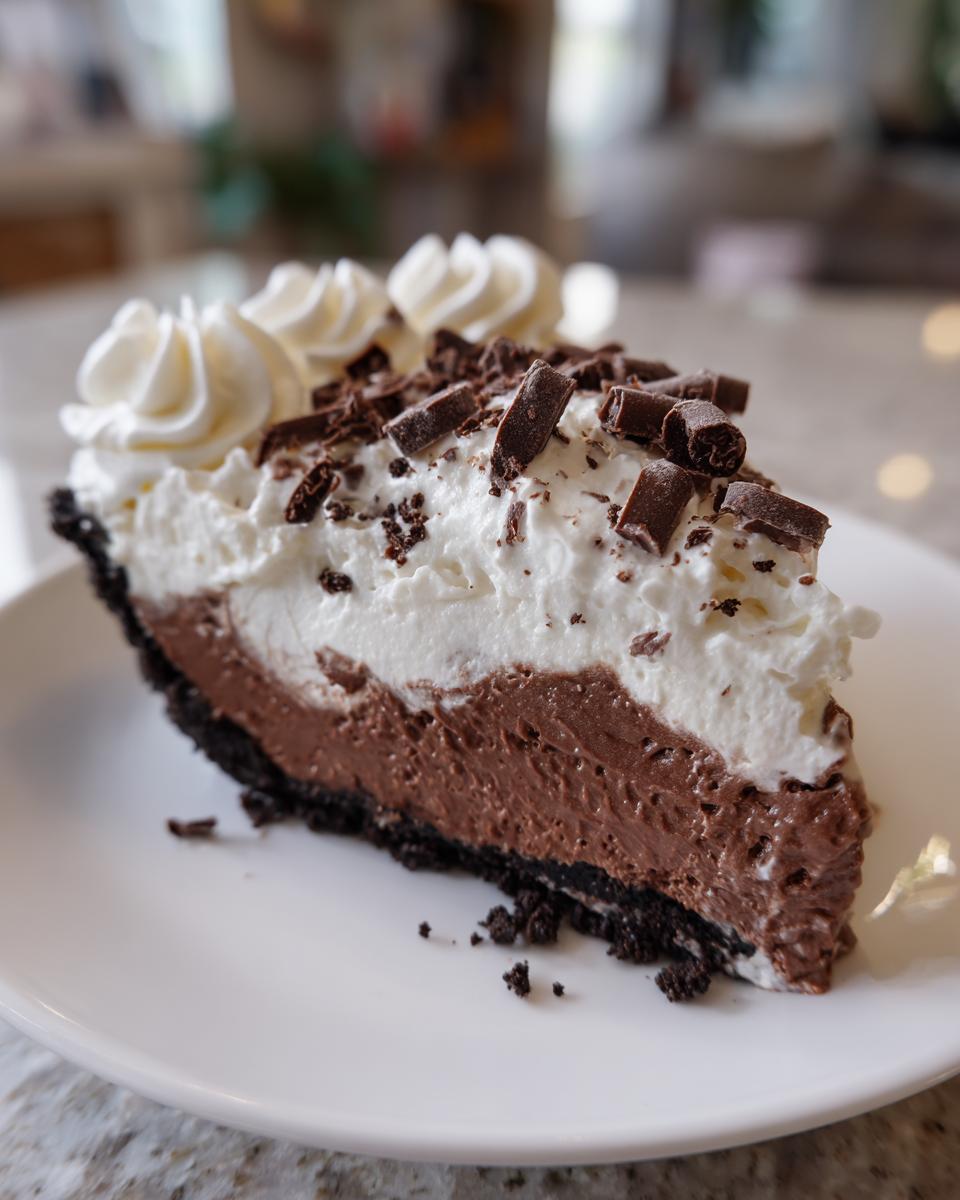
Oh, the holidays! Everyone expects that show-stopping dessert, right? But let’s be real, juggling oven space and last-minute tasks is stressful enough. That’s why I’m completely obsessed with this Christmas chocolate cream pie. It looks incredibly festive—that dark, rich chocolate against mountains of bright white cream—but it’s secretly one of the easiest make ahead Christmas desserts you’ll ever tackle.
Forget fiddly pastry! We start with a simple Oreo crust, which I think every holiday dessert should have. The filling is pure, no-fail chocolate heaven. Trust me, having this completely done the day before Christmas is a game-changer. As a former recipe developer, I can personally guarantee this recipe has been tested until it’s totally foolproof, so you can serve this spectacular holiday chocolate pie recipe with zero stress.
- Why This Christmas Chocolate Cream Pie is Your Go-To Holiday Chocolate Pie Recipe
- Gathering Ingredients for Your Christmas Chocolate Cream Pie
- Expert Tips for Perfecting the No Fail Chocolate Cream Pie Filling
- Step-by-Step Instructions for Your Holiday Chocolate Pie Recipe
- Ingredient Notes and Substitutions for Your Christmas Chocolate Cream Pie
- Tips for Success When Making Festive Christmas Dessert Ideas
- Storage and Serving Your Christmas Chocolate Cream Pie
- Frequently Asked Questions About This Easy Holiday Pie Recipe
- Estimated Nutritional Data for the Christmas Chocolate Cream Pie
- Share Your Festive Christmas Dessert Ideas
Why This Christmas Chocolate Cream Pie is Your Go-To Holiday Chocolate Pie Recipe
When the holidays roll around, I want my desserts to look like they took days, but actually take minutes. That’s the magic of this pie! It checks all my boxes for a successful centerpiece dessert. I promise you, this is the kind of reliable recipe you’ll keep coming back to year after year.
- It’s incredibly rich and satisfying—like a decadent chocolate fudge pudding, but lighter.
- It’s beautiful! The contrast between the dark filling and that fluffy white topping screams Christmas celebration.
- It is shockingly simple since we skip making a pastry shell from scratch.
If you’re planning your massive holiday menu, you’ll want to check out all my best holiday baking tips for keeping things organized!
Make Ahead Christmas Desserts Simplicity
This is heaven for anyone prepping ahead! You absolutely have to chill this pie for at least four hours, but truthfully, it’s ten times better if you make it the entire day before your party. The chilling time isn’t optional; it’s essential so that filling sets up firm enough for slicing. That’s the beauty of make ahead Christmas desserts—it clears up valuable oven space right when you need it.
The Foolproof Oreo Crust Chocolate Cream Pie Base
I almost always cheat and use a store-bought Oreo crust, and I don’t feel bad about it one bit during the holidays! It saves you about 20 minutes right off the top. Since this is a Oreo crust chocolate cream pie, that slightly salty, crunchy chocolate base is the perfect contrast to the smooth custard. If you do want to make your own later, I left the instructions in the notes section!
Gathering Ingredients for Your Christmas Chocolate Cream Pie
Okay, let’s look at what we need! Because this is such a smooth, pure holiday chocolate pie recipe, the quality of your ingredients really shines through. Don’t substitute my directions here—especially for the milk or the chocolate powder, because that’s where the richness comes from. I’ve broken it down so you can grab exactly what you need from the pantry and fridge. Having everything measured out before you turn on the stove makes the whole custard process so much calmer!
For the Rich Chocolate Filling
This is the heart of the pie, so check your pantry twice for these quantities:
- One 9-inch Oreo cookie crust (pre-made is the holiday secret weapon!)
- 1 3/4 cups of regular white granulated sugar
- 1/2 cup unsweetened cocoa powder—make sure it’s not hot chocolate mix!
- 1/4 cup cornstarch—this is our sturdy thickener, don’t skip it!
- 1/2 teaspoon salt
- 3 cups of nice, cold whole milk
- 4 large egg yolks (save the whites for meringue another day!)
- 2 generous tablespoons of unsalted butter
- 1 teaspoon pure vanilla extract
For the Whipped Cream Chocolate Pie Topping
This part has to be fluffy perfection for that festive look:
- 2 cups heavy whipping cream—make sure it’s cold, cold, cold!
- 1/4 cup powdered sugar (also called confectioners’ sugar)
- 1 teaspoon vanilla extract (Yes, we use a separate splash here!)
- Chocolate curls or some bright green and red holiday sprinkles for that amazing final presentation.
Expert Tips for Perfecting the No Fail Chocolate Cream Pie Filling
When I was developing recipes professionally, the biggest fear people had about custard fillings was accidentally making sweet scrambled eggs! Honestly, that’s why I love this recipe; it uses the science of starch (that cornstarch we added!) to keep everything smooth, even under heat. Because I want you to feel completely confident making this beautiful Christmas chocolate cream pie, let me share the two most important spots where you need to be paying attention while you stir.
If you ever want to dive deep into how heat affects thickening agents, I shared some fun science about custard making science over here, but for now, just follow these two tricks!
Achieving the Right Consistency in Your Christmas Chocolate Cream Pie
When you first heat the milk, sugar, and cocoa mixture, you’re waiting for it to thicken up—it’ll go from watery to looking like thick pancake batter. Once you see that first big bubble break the surface? That means it’s officially boiling. You must let it boil, stirring like crazy the whole time, for one full minute. This activates the cornstarch! After you add the yolks back in, heat it gently again until it thickens right back up—but stop right there! Do not boil it after the yolks are reintroduced, or it will curdle on you. You want it to look glossy and heavy when you lift your spoon.
Tempering Egg Yolks: A Key Step for Success
This sounds fancy, but it’s so simple! We need to slowly warm up those egg yolks before they meet the main hot mixture, otherwise—scramble city! Take a small ladle or about a cup of the hot chocolate base and drizzle it *very slowly* into your bowl of whisked yolks while whisking nonstop. Slow is the key here. You’re gently nudging the yolks up to a safe temperature. Once they look warm and thin, you can pour that tempered mixture right back into the pot with the rest of the hot chocolate. See? No scrambled bits!
Step-by-Step Instructions for Your Holiday Chocolate Pie Recipe
Alright, let’s get serious about building this gorgeous Christmas chocolate cream pie. Don’t let the number of steps scare you; they are all very quick, especially since we’re using that fantastic store-bought crust! We approach this in two main phases: getting the filling perfect and then topping it with that gloriously fluffy cream. Read everything through first, and you’ll be amazed at how fast this comes together before it heads into the fridge.
Preparing and Setting the Chocolate Filling
First thing: grab a saucepan. Whisk together your sugar, cocoa powder, cornstarch, and salt in that dry pan. Then, slowly pour in the cold milk while you whisk everything until it looks totally smooth—no lumps allowed! Set that over medium heat. You need to stir constantly until it gets thick and starts boiling vigorously. Let it boil for a full minute while you keep stirring, then pull it right off the heat.
Now for the tempering trick we just talked about! Whisk those four egg yolks in a small bowl. Slowly, slowly drizzle about a cup of that hot chocolate base into the yolks while whisking like mad. Once those yolks look warm, pour that warmed mixture back into the main saucepan. Put it back on medium heat and cook for just about 2 minutes more until it thickens again—remember, don’t let it boil this time! Stir in your butter and the first teaspoon of vanilla until it melts beautifully. Pour that rich custard straight into your Oreo crust. Crucial step: take a piece of plastic wrap and press it physically right down onto the surface of the chocolate. This stops that dreaded skin from forming while it chills. Pop it in the fridge for at least four hours, or better yet, overnight!

Finishing the Whipped Cream Chocolate Pie
Once your filling is completely, solidly cold, it’s time for the crowning glory! Use a big, clean bowl for this part. Combine your cold heavy whipping cream, powdered sugar, and the final teaspoon of vanilla. Using your electric mixer, start slow and then crank it up. You are whipping until you see stiff peaks form—that’s when the cream holds its shape perfectly and doesn’t droop over at the tip.
Gently spread or pipe that stunning whipped cream topping all over your set filling. Trust me, piling it high looks fantastic for a holiday presentation! Finish it off right before the party with those chocolate curls or festive sprinkles. Keep the whole whipped cream chocolate pie chilled until you’re ready to slice and serve.
Ingredient Notes and Substitutions for Your Christmas Chocolate Cream Pie
Even though this recipe is designed to be wonderfully straightforward, I always get questions about ingredients when people are planning big festive Christmas dessert ideas. It’s good to know your options, especially if you forgot to grab an Oreo crust at the store! I want to make sure this easy holiday pie recipe works for everyone, no matter what you have on hand. Don’t worry, making a few small tweaks won’t ruin that creamy, rich filling we worked so hard to perfect.
Can I Use Different Crusts?
The Oreo crust is my favorite here because it handles that wet custard filling so beautifully, but yes, you can swap it out! A graham cracker crust works fine, but since it’s less sweet and a little lighter, you might want to add an extra tablespoon of sugar to the crust mixture if you decide to make it homemade—I put the butter ratio in the notes section earlier. No matter which crust you choose, make absolutely certain it is completely cool before you pour in that hot chocolate filling. If it’s warm, you’ll end up with a soupy mess!
Cocoa Powder Choice
You’ll notice the recipe just calls for unsweetened cocoa powder. That generally means the natural, non-alkalized kind—it’s the standard you find in most boxes. If you happen to only have Dutch-processed cocoa powder, it will still taste amazing, but just know it’s a bit darker and lacks some of the acidic bite that balances the sugar in a purely natural cocoa. For this recipe, either will give you a fantastic result for your no fail chocolate cream pie. It’s foolproof either way, I promise!
Tips for Success When Making Festive Christmas Dessert Ideas
Now that you have your perfect, chilled pie base, let’s talk presentation! Serving a stunning Christmas chocolate cream pie at the table is what makes us feel like a holiday hero, right? My biggest tip when dealing with a big holiday dessert spread is keeping the topping stable. Since this is such a high-impact dessert for your collection of festive Christmas dessert ideas, you want that whipped cream to look sharp when you serve it.
When I was developing recipes for magazines, I learned that presentation is half the battle. If you want those tall, crisp peaks that really scream “Christmas,” make sure your bowl and your beaters are chilled in the freezer for about ten minutes before you start whipping the cream. It helps the fat stabilize faster! For more tips on making your holiday spreads shine this year, check out my guide to holiday decorating ideas.
Oh, and don’t skimp on the vanilla for the topping. If you are looking to splurge just a little bit on the best flavor enhancer for that cream, I always point people toward high-quality pure vanilla, maybe even one of those wonderful clear extracts if you don’t want any dark specks in your pure white topping. You can see what I recommend for best vanilla extract here. Seriously, that tiny difference makes the topping taste extra special!
Storage and Serving Your Christmas Chocolate Cream Pie
Since this is one of my favorite make ahead Christmas desserts, I know a thing or two about keeping it fresh! This beautiful Christmas chocolate cream pie lasts wonderfully in the refrigerator for about three to four days, stored loosely covered, making it perfect to prep early in the week if needed.
The only tricky part is the whipped cream topping. To keep it looking perfectly tall and festive, I like to wait until about 30 minutes before serving to add that topping and the sprinkles. When you go to slice it, use a very hot, sharp knife—dip it in hot water and dry it immediately between each cut. This melts the chocolate just enough for a clean slice right through that creamy filling!
Frequently Asked Questions About This Easy Holiday Pie Recipe
I always get the same questions when people are planning their holiday menus, so let’s knock these out right now! I want to make sure your experience with this easy holiday pie recipe is stress-free from start to finish. Knowing the answers to these little troubleshooting areas means you get perfect results every time.
Can I use a homemade crust instead of the Oreo crust chocolate cream pie base?
Absolutely! That’s what I love about making this the centerpiece of my festive Christmas dessert ideas—it’s flexible. If you decide to make your own crust, remember the ratio I mentioned earlier: it’s about 1 1/2 cups of crushed cookies mixed with 6 tablespoons of melted butter pressed into the plate. The most important thing is that homemade or store-bought, that crust absolutely must be completely, totally cool—I mean cold—to the touch before you pour in the hot chocolate filling. If it’s even slightly warm, that beautiful custard will just melt right through it!
How do I keep the whipped cream topping from weeping?
Oh, weeping cream! That’s the enemy of any beautiful whipped cream chocolate pie, especially when it sits in the fridge for a day. The absolute best defense is making sure that chocolate filling is rock solid cold before the cream ever touches it. If the filling is even slightly warm underneath, the heat transfers and makes the cream break down. If you’re seriously worried, or if your kitchen is warm, you can add about a teaspoon of unflavored gelatin dissolved in a tablespoon of cold water to the cream right before you start whipping. It acts like a secret stabilizer and keeps those peaks looking sharp for days!
Is this recipe suitable for making two days ahead?
For the best texture and flavor, I really stress making this Christmas chocolate cream pie the day before serving. That allows the filling to set perfectly and gives the flavors time to meld without making the crust soggy. If you need to go two days out, you can certainly make the filling and keep it chilled in the crust (covered tightly!) for up to 48 hours. However, I strongly recommend whipping the cream topping no more than 12 hours before serving. The topping just stays fresher and fluffier when kept separate until the last minute!
Estimated Nutritional Data for the Christmas Chocolate Cream Pie
Now, I know we aren’t baking this pie for health reasons, right? It’s the holidays, and this is pure, delicious indulgence! But for those of you keeping track, here are the ballpark estimates for one slice of this rich delight. Remember, these numbers are based on using standard pantry ingredients, so your actual totals might shift a tiny bit based on the crust you choose or how heavy your hand is with the whipped cream topping!
- Calories: About 450 per slice
- Total Fat: Around 25g
- Carbohydrates: Roughly 55g
- Protein: About 6g
It’s one of those spectacular easy holiday pie recipes that’s totally worth every single calorie when surrounded by family!
Share Your Festive Christmas Dessert Ideas
I really hope this Christmas chocolate cream pie becomes a tradition for you, just like it is for my family! Seriously, there is nothing that makes me happier than knowing one of my recipes made it onto your holiday dessert table.
When you make this, please come back and let me know how it went! Did you decorate it with extra chocolate curls? Did you add a pinch of espresso powder to the filling like I sometimes do? Leaving a star rating and a quick comment tells me you had success, and it helps other home cooks feel confident trying out this amazing holiday chocolate pie recipe too.
And for goodness sake, snap a picture! I adore seeing your gorgeous creations. Tag me on social media so I can see how you styled your pie—I love gathering inspiration for even more festive Christmas dessert ideas for next year. Happy baking, and enjoy every rich, creamy bite!
PrintMake Ahead Christmas Chocolate Cream Pie

A rich, no-fail chocolate cream pie with an Oreo crust, perfect for your holiday dessert table and easy to prepare in advance.
- Prep Time: 20 min
- Cook Time: 15 min
- Total Time: 4 hours 35 min
- Yield: 8 servings 1x
- Category: Dessert
- Method: No Bake (Filling)
- Cuisine: American
- Diet: Vegetarian
Ingredients
- 1 pre-made 9-inch Oreo cookie crust
- 1 3/4 cups granulated sugar
- 1/2 cup unsweetened cocoa powder
- 1/4 cup cornstarch
- 1/2 teaspoon salt
- 3 cups whole milk
- 4 large egg yolks
- 2 tablespoons unsalted butter
- 1 teaspoon vanilla extract
- 2 cups heavy whipping cream
- 1/4 cup powdered sugar
- 1 teaspoon vanilla extract
- Chocolate curls or holiday sprinkles for topping
Instructions
- Prepare the chocolate filling: In a medium saucepan, whisk together the granulated sugar, cocoa powder, cornstarch, and salt.
- Gradually whisk in the cold milk until smooth.
- Place the saucepan over medium heat. Cook, stirring constantly, until the mixture thickens significantly and comes to a boil. Boil for 1 minute, still stirring. Remove from heat.
- In a small bowl, whisk the egg yolks lightly. Temper the yolks by slowly whisking about 1 cup of the hot chocolate mixture into the yolks.
- Pour the tempered yolk mixture back into the saucepan with the remaining hot chocolate mixture. Return to medium heat. Cook, stirring constantly, for 2 minutes until the mixture thickens again. Do not boil.
- Remove the saucepan from the heat. Stir in the butter and 1 teaspoon vanilla extract until smooth.
- Pour the hot chocolate filling into the Oreo crust. Press plastic wrap directly onto the surface of the filling to prevent a skin from forming. Chill in the refrigerator for at least 4 hours, or preferably overnight, until completely cold.
- Prepare the whipped cream topping: In a large bowl, beat the heavy whipping cream, powdered sugar, and 1 teaspoon vanilla extract with an electric mixer until stiff peaks form.
- Spread or pipe the whipped cream over the chilled chocolate filling.
- Decorate the top with chocolate curls or holiday sprinkles before serving. Keep refrigerated until ready to serve.
Notes
- You can make this pie completely one day ahead of your Christmas gathering. The chilling time is essential for the filling to set properly.
- For a festive look, use green and red holiday sprinkles on top of the whipped cream.
- If you prefer a homemade crust, use 1 1/2 cups of finely crushed Oreo cookies mixed with 6 tablespoons of melted butter, pressed into a 9-inch pie plate, and baked for 10 minutes at 350°F before cooling completely.
Nutrition
- Serving Size: 1 slice
- Calories: 450
- Sugar: 45g
- Sodium: 350mg
- Fat: 25g
- Saturated Fat: 15g
- Unsaturated Fat: 10g
- Trans Fat: 0g
- Carbohydrates: 55g
- Fiber: 2g
- Protein: 6g
- Cholesterol: 110mg